Today we're going to be adding the finishing touches to our quilts. I'm going to show you pictures of how I chose to finish my quilt, but please feel free to embellish your quilt however you like! This is the time to play and really personalize your project.
I chose to use embroidery to embellish my quilt, and if you'd like to go that route, you'll need red, green, gold, blue, and ecru embroidery floss and red and green size 8 perle cotton -- again, you can definitely substitute embroidery floss for the perle cotton.
I used only simple embroidery stitches for my embellishments, specifically running stitch, back stitch, lazy daisy stitch, and french knots. We've already used the back stitch, but if you're unsure how to do the other stitches, you can refer again to DMC's embroidery stitch guide. And finally, I used two strands of embroidery floss for all of the stitching unless otherwise indicated. Let's get started:
Finishing Peace on Earth:
Windows:
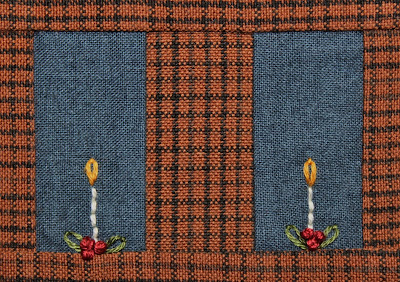
Add candles to the cabin's windows using ecru floss and a straight stitch. The flames and holly leave are a made with lazy daisy stitches in gold floss and green floss, respectively. And the berry clusters are made with three french knots each.
Door:
To mark a circle for the wreath on your cabin's door, simple use a marking pencil and trace around a dime or a small button. Use a back stitch and green floss to stitch around the circle. The bow is made with red floss and two lazy daisy stitches. Use two longish straight stitches for the ribbon ends.
Roof Line:
Use green floss and a back stitch to outline the cabin's roof. Then stitch angled single stitches randomly along the back stitched line to look like garland. Finish up by stitching french knots every so often using red floss.
Pine Tree:
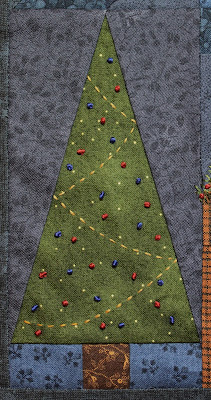
Decorate the tree using gold floss and a running stitch to look like garland. Then use red and blue floss and french knots to stitch ornaments on your tree. You could also use seed beads in place of the french knots if you like.
Quilting:
Layer backing, batting, and embellished quilt top together and baste. I planned to do very little quilting on this project, so I decided to baste my quilt by lightly spraying basting adhesive between each layer. I then marked a line ¼" inside each of the plain inner border seams and quilted using big stitch quilting. Big stitch quilting is simply a big (⅛" - ¼") running stitch. I used green perle cotton on the outside marked line and red perle cotton on the inside marked line. But remember, if you don't have perle cotton, you can use two-three strands of embroidery floss for this step.
Here's a close-up of a corner of the quilted border -- I LOVE how the intersection of the green and red quilting resembles plaid.
That's all the quilting I did. I stopped quilting because I couldn't wait to finish the quilt and because it is so small and light that it doesn't really require more, but quilt on if you like! You could add texture to the cabin by quilting lines to look like logs or give dimension to the tree by quilting along the garland. Or you could quilt around the wool leaves and letters and alongside the embroidered vine.
After you finish quilting, trim your quilt and bind in a dark blue print.
And that's it! You've finished your Peace on Earth quilt! Hooray!!! The mystery is solved -- and just in time for Christmas!
I've had so much fun rolling out this little project that I'm already planning to do a new holiday mystery quilt next year. I'd love to hear any suggestions or comments that you might have about how I could improve the experience.
I'd also LOVE to see pictures of your finished Peace on Earth quilts -- you can send them to me at jendalyquilts@gmail.com. Let me know if you'd like me to post a picture of your quilt on my blog -- show and tell anyone?!
Thank you so much for following along over the past few weeks. I wish you all the happiest of holidays and a new year filled with joy and, of course, peace!
Cheers! Jen


