Sunday, December 22, 2019

Merry Little Christmas Stitch-Along — Day 11

Welcome back for the 11th and final day of the Merry Little Christmas Stitch-Along!


Today we're finishing our darling little pillows with an overlapping back and binding.


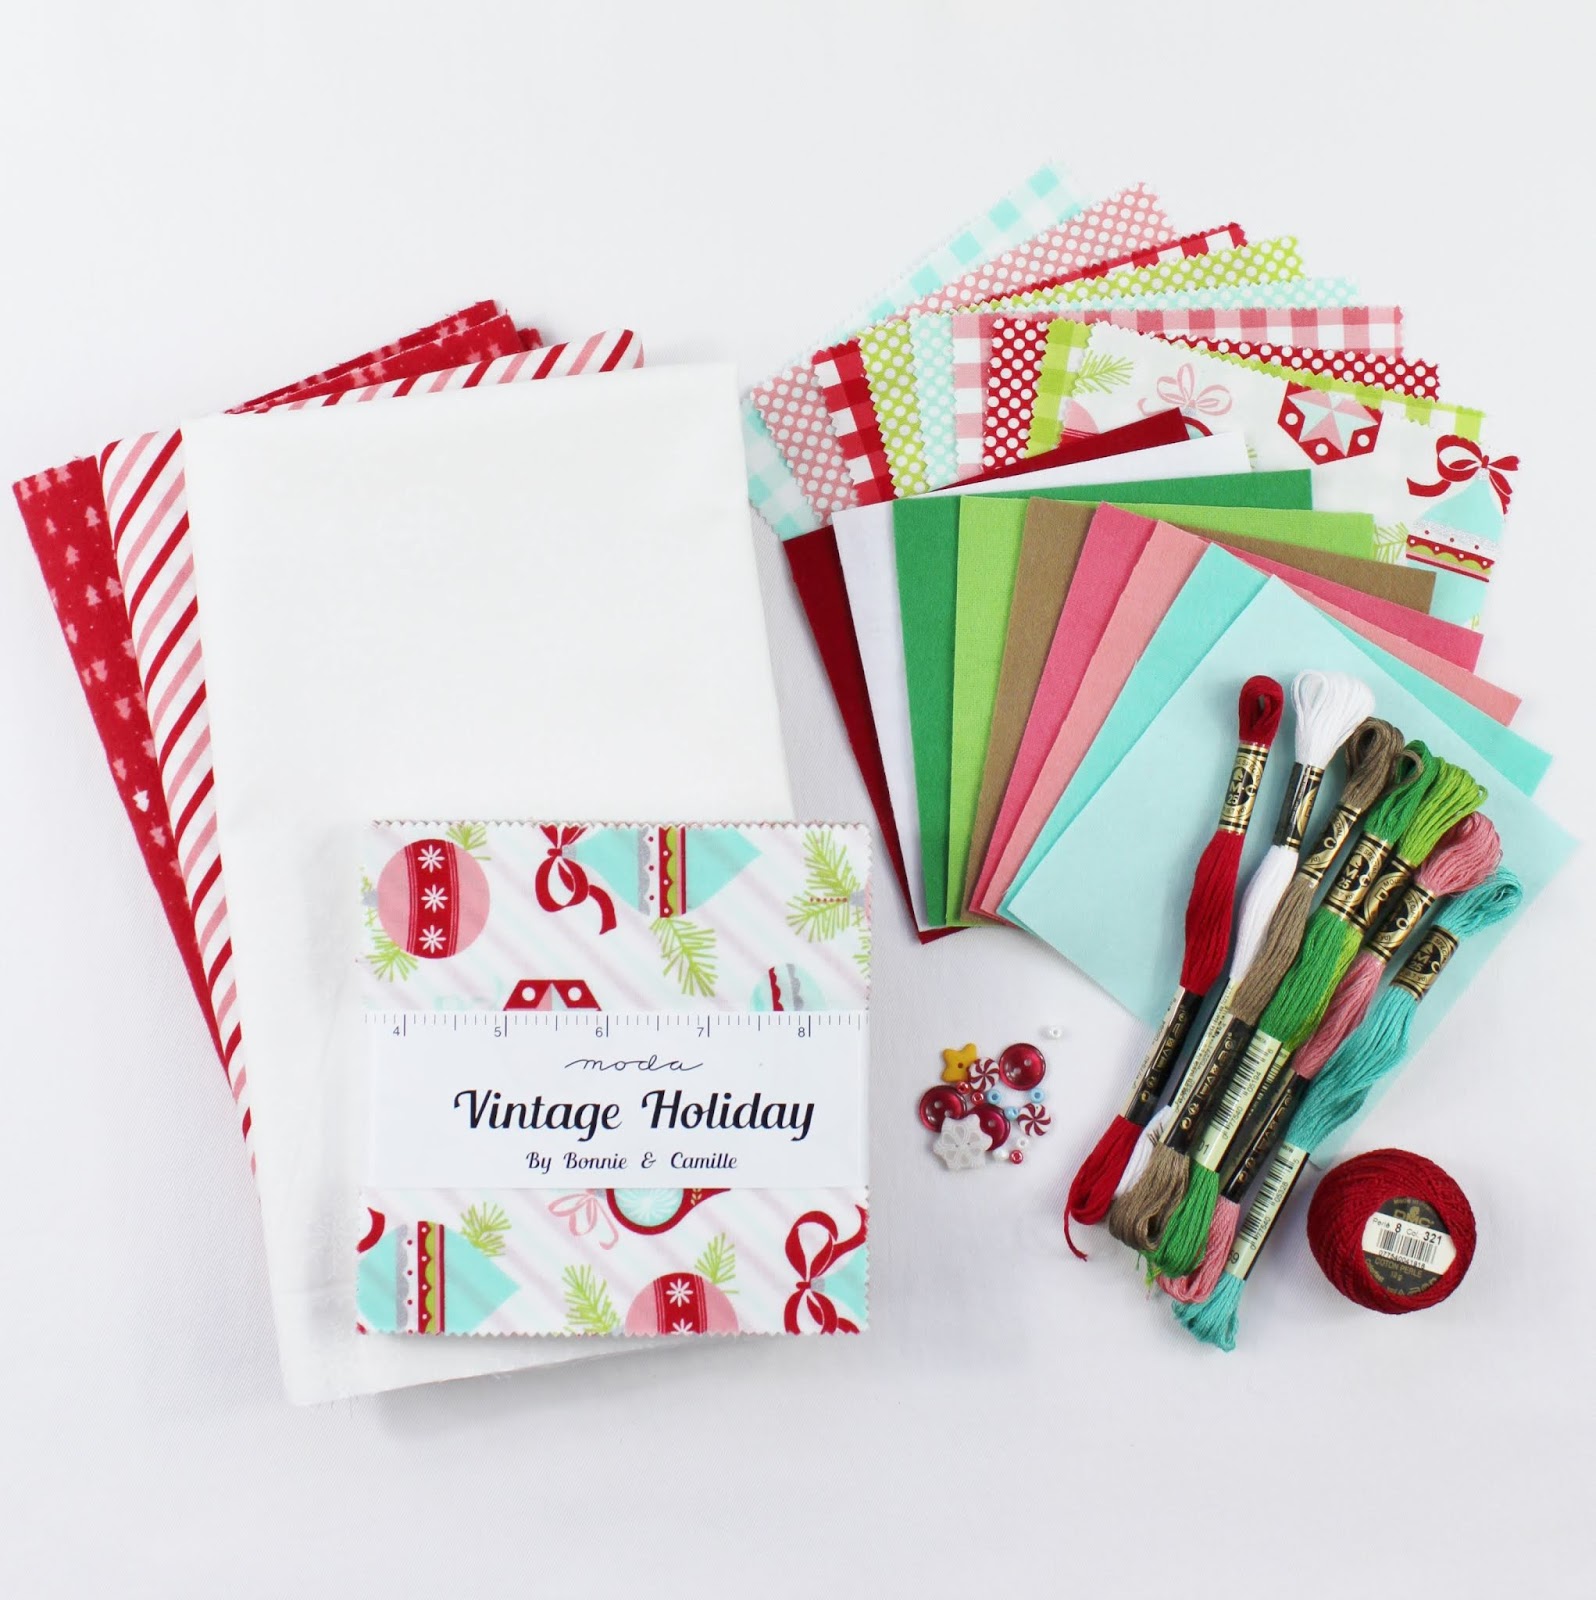
In addition to your quilted pillow top, you'll need:
  • ½ yard red print for pillow back
  • ¼ yard binding fabric
  • 16" x 16" pillow form


Once again, I'll include instructions here and on a printable pattern sheet—here's the link.

Day 11:  Finishing

Cutting:
From the red print, cut:
  • (2) backing panels 12½" x 16½"

From the binding fabric, cut:
  • (2) binding strips 2½" x 42" (Width of Fabric)

Assembly:
1.  Trim the batting and muslin even with the quilted pillow top.

2.  Fold one long edge (16½”) of a backing panel toward the wrong side ½” twice and press to form a hem.

3.  Stitch close to the inside folded edge to finish the hem.

4.  Repeat to hem the second backing panel.

5.  Lay quilted pillow top face down on a flat surface.  Layer a backing panel on the back of the quilted pillow top sandwich with right side down and wrong side up, and raw edges aligned.

6.  In the same manner, layer the remaining backing panel on the opposite edge of the pillow top sandwich with raw edges aligned.


7.  Pin to secure all layers.  Machine baste ⅛” from raw edges if desired.

8.  Join the 2 binding strips and bind as usual.

9.  Insert pillow form.

10.  And voilà!  You did it!


Here's my finished pillow.  I really love how bright and colorful it is and that candy-striped binding is so sweet!


And here's a picture of both of my pillows together.  They're so different, but I love them both!


If you love the look of quilted projects embellished with appliqué and embroidery, you might want to take a look at my book, "Stitching for the Seasons."  Inside you'll find 20 seasonal quilting projects, 14 of which combine patchwork, embroidery and appliqué.  The book is available at booksellers and quilt shops—wherever you like to buy quilting books!  For more information and a peek inside, check out the book page on my website.

Stitching for the Seasons


Thank you so much for following along with the Merry Little Christmas Stitch-Along.  I've thoroughly enjoyed being your host and I hope that you've had fun stitching your way through the season!  

But most of all, I hope you have yourself a Merry Little Christmas and a Happy New Year!

All my best,

—jen

Casey, my sweet quilting companion

Friday, December 20, 2019

Merry Little Christmas Stitch-Along — Day 10

Welcome back for Day 10 of the Merry Little Christmas Stitch-Along!


Today we're going to tackle assembling our quilted pillow tops and adding the red big-stitch quilting that ties this charming pillow together!


You'll need:
  • Your 9 appliquéd blocks
  • ¼ yard background fabric (mine is a white tone-on-tone)
  • 18" x 18" piece of batting
  • 18" x 18" piece of muslin (or a similar lining fabric)
  • Red size 8 perle cotton


I'll include today's instructions both here and on a printable pattern sheet.  Here's the link for the pattern sheet.


Day 10:  Assembly

I love the look of the red big-stitch quilting on this project, but if you're short on time, you could also do a decorative machine stitch on the sashing rows and borders.  Layering your pieced top with the batting and muslin will help add dimension to whatever decorative quilting or stitching you choose to do.

The layout that I used for my pillow top is only a suggestion.  I used a different one for my traditional pillow, although I did keep the gingerbread man in the center of both because it's the only brown block.  Here's a look back at my traditional pillow:


Once again, do what you love and make it your own!

That's it for today!  I'll see you back here on Sunday for the final day of the Stitch-Along.

Happy Stitching!

—jen

Wednesday, December 18, 2019

Merry Little Christmas Stitch-Along — Day 9

Welcome back for Day 9 of the Merry Little Christmas Stitch-Along!


For our 9th and final appliqué block, we'll be making Christmas Trees.  I've used metallic floss and seed beads to decorate my tree, but feel free to decorate yours however you like.  For the garland, you could use regular floss or a more decorative stitch, and for the ornaments you could substitute tiny buttons, bells or even stitched French knots.  Have fun and make it your own!


And here's the Christmas Tree that I made for my traditional pillow:


Have fun making your last block!  I'll see you back here on Friday for Day 10 and our first day of assembly.  Can't wait!

—jen


Monday, December 16, 2019

Merry Little Christmas Stitch-Along — Day 8

It's Monday morning and I'm so happy to be back here for Day 8 of the Merry Little Christmas Stitch-Along!

Today we're making ornament blocks!


This is a super simple block, but the embroidered stars and the whipped blanket stitch around the red stripe make it extra special.  I love how the whipped blanket stitch resembles candy striping!

If you need more help with the whipped blanket stitch, you can find a lot of pictures and short tutorial videos online by searching "whipped blanket stitch."

Here's the ornament block I made for my traditional version of the pillow.  The red/white whipped blanket stitch really stands out on this block!  I think this may be my new favorite embroidery stitch—maximum output for minimum input!


That's it for today!  I'll see you back here on Wednesday for Day 9 and our last little block.  Can't wait!

—jen


Saturday, December 14, 2019

Merry Little Christmas Stitch-Along — Day 7

It's Day 7 of the Merry Little Christmas Stitch-Along and today we're making candy canes!


The instructions for today's block are a little bit different.  When I first attempted this block, I tried fusing and appliquéing the candy cane shape first and then fusing and appliquéing the stripes afterwards, but to my eye, the block looked a bit bulky and messy.  I'd also had a difficult time neatly aligning the outer edges of the white stripes with the outer edge of the candy cane, especially with the thicker wool.

So I tried again, but this time, I cut the white stripes longer than the patterns at both outer ends and fused them in place on the candy cane first, using a piece of parchment paper beneath the candy cane to be sure it didn't stick to my ironing board.  With the longer stripes in place, I flipped the candy cane over and trimmed the stripes even with the outer edge of the candy cane.  Then I fused the whole unit to the background fabric, blanket stitched the white stripes only on their inner edges and finished by using red floss to blanket stitch around the outer edge of the entire candy cane.  Using this method made for a much neater finished product.

And for a little more eye candy, here's the candy cane block that I made for my traditional pillow:


Thanks for stopping by on your weekend!  I'll see you back here Monday for Day 8!

—jen


Thursday, December 12, 2019

Merry Little Christmas Stitch-Along — Day 6

Welcome back for Day 6 of the Merry Little Christmas Stitch-Along.  We're halfway through the Stitch-Along now, and as we get closer to Christmas, I'm definitely enjoying taking a break every other day to stitch these sweet little blocks!


Today we'll be making stockings.  The stocking block, with its white cuff, has the potential to look a lot like the mitten block that we made on Day, so I decided to change things up.  Instead of using matching white embroidery floss to blanket stitch the cuff, I used the same green that I planned to use for the lazy daisy holly leaves.  The stitching definitely shows up more, so I worked hard to keep it even, but I think the contrast is worth it.  

And here's the stocking block that I made for my traditional pillow.  I love the background fabric for this block, especially how the holly leaves and berries echo the stitching on the stocking's cuff.  And the red tweed wool?  Seriously gorgeous!


That's it for today!  Have fun stitching your stockings and I'll see you back here on Saturday for Day 7!

—jen


Tuesday, December 10, 2019

Merry Little Christmas Stitch-Along — Day 5

It's Day 5 of the Merry Little Christmas Stitch-Along and today we're making gingerbread men!


Between the brushed texture of the flannel/wool, the contrast of the white stitching and the darling peppermint buttons, these little gingerbread men look just like cookies!


And here's the gingerbread man block that I made for my traditional pillow using a slightly darker brown wool:


You may notice that the buttons that I used for this block are a bit smaller.  They're also from JABC, namely the tiny peppermint swirl (sku:  nh1067.T).

Have fun making your own gingerbread men and feel free to embellish them as much as you like.  I've kept mine pretty simple, but if you search online for gingerbread man cookie images, you'll find a lot of great ideas.  I can't wait to see what you come up with!

—jen

Sunday, December 8, 2019

Merry Little Christmas Stitch-Along — Day 4

Welcome back for Day 4 of the Merry Little Christmas Stitch-Along!  Thank you for taking a few minutes out of your precious weekend to be here!

Day 4 - Mitten


Today we're making a little mitten block embellished with a charming snowflake.


Here's a look at the mitten that I stitched for my traditional pillow:


I love how the pattern of the wool resembles knitting!  I wouldn't mind having a pair of mittens that looked just like this!

That's it for today!  Enjoy the rest of your weekend, and I'll see you back here Tuesday for Day 5's block—can't wait!

—jen

Friday, December 6, 2019

Merry Little Christmas Stitch-Along — Day 3

Happy Friday!  It's Day 3 of the Merry Little Christmas Stitch-Along and today we're making Santa's hat!

Day 3 - Santa's Hat


We'll spruce up the cuff of the hat with an embroidered garland, complete with French knot berries, and then top the hat off with a sweet little snowflake button.  My button is the "small snowflake" (sku 4442.s) from Just Another Button Company—I love, love, love their buttons!

The hat pattern has already been reversed for use with the fusible web.  I've also drawn a sample wavy line on the cuff for the stitched garland.  Use my line as a pattern, draw your own or simply freehand stitch a wavy line—once you add the straight stitches and berries to the garland, the wavy line doesn't show up very much, so don't worry about making it perfect.

Here's the Santa hat that I made with wool for my traditional pillow:


I love the red plaid wool that I used for the hat.  It's subtle, but gives it a bit of extra texture—so much fun!

I'll be back here on Sunday with a new block.  In the meantime, have fun making your Santa hats!

—jen

Wednesday, December 4, 2019

Merry Little Christmas Stitch-Along — Day 2

We're back for Day 2 of the Merry Little Christmas Stitch-Along and today we're making gift blocks!


This is is simple little block, but it's made extra special by the embroidery in the ribbon and bow top!

If you'd like to mark your embroidery before stitching, I've got a few thoughts for you.  For this project, I experimented with a chalk pencil, chalk transfer paper and a disappearing ink pen.  I found that I liked using the disappearing ink pen on the flannel.  The ink did disappear overnight, but I discovered that I could also speed along the process by spritzing it with water and blotting it dry.  For the wool, I had better luck with the chalk pencil and the chalk transfer paper.

Whichever marking implement you choose, do a test with the actual flannel or wool you're using to be sure that your markings can be removed when you've finished stitching.  And if you're just trying to mark a straight line, like with today's block, thin masking tape is always a great option—just lay it down, stitch along the edge, gently pull it off and voila!

Here's the wool gift block that I made for my traditional version of the pillow.  My favorite part is the red stitching on the white ribbon and bow—it has a kind of peppermint stick vibe that I love!


And that's it for today!  Happy stitching and I'll see you back here Friday for our next block!

—jen

Monday, December 2, 2019

Merry Little Christmas Stitch-Along — Day 1

Welcome to Day 1 of the Merry Little Christmas Stitch-Along!

The holiday season is underway and we have only a few short weeks remaining for holiday preparations.  Yikes!  When I came up with the idea for this stitch-along, I envisioned a fun and easy project that would give us an excuse to slow down for an hour or two every other day, while still being gently productive (and right now, I'm feeling pretty happy about that decision!).

To that end, we'll spend most of the stitch-along hand-appliquéing charming blocks to be assembled into a pillow.  The prep work for each block takes only a few minutes and the stitching should only take a couple of hours, just long enough for a holiday movie.  I plan to do most of my stitching by the tree in the evening, with a fire in the woodstove and the tv tuned to the Hallmark Channel (I know I'm not the only one with that particular habit!).  I hope you'll find this stitch-along restorative—a chance not only to take a break from all the busyness, but also to savor the season and, of course, to make a pillow you love!

Before we get started with today's block, I have just a few housekeeping details:

  • Every other day in December, from now until the 22nd, I'll be posting the next stage of our stitch-along here on the blog. 
  • Links to downloadable instruction/pattern sheets for each day will be available both here and on the stitch-along page.  
  • Here's the link to a general Appliqué/Embroidery Instructions sheet that you'll need to refer to throughout the stitch-along.
  • I mention this on the general Appliqué/Embroidery Instructions sheet, but it's worth repeating here:  with all of your blocks, be sure to allow for seam allowances by positioning all flannel/felted wool and embellishments at least ½" from the outer raw edge of your 4½" fabric squares.
  • If you haven't yet had a chance to gather your materials, no worries—here's a link to the stitch-along materials page—jump in and join us whenever you can!

All set?  Here we go!


Day 1:  Holly

Today's block is a pair of holly leaves with button holly berries.  Couldn't be simpler—or sweeter!


In the interest of keeping the blog posts short, I won't write out each day's block instructions here.  But between the general Appliqué/Embroidery Instructions sheet that I mentioned in the housekeeping details and today's pattern sheet, you should have everything you need to make today's block.

Here's a look at the Holly block that I made for my traditional pillow.  


Instead of flannel, I used felted wool in two different green plaids atop a dark red print fabric.  I love this classic look, but I've got to say, the contrast between the red gingham and the bright green flannels on my bright version makes my heart sing!!

Have fun making today's block!  And don't forget, if you post on IG or Facebook, please tag me @jendalyquilts and use the hashtag #merrylittlechristmassal.  You can also email me jendalyquilts@gmail.com.  I can't wait to see what you're making.

—jen


Monday, November 18, 2019

2019 Merry Little Christmas Stitch-Along Coming Soon!!

I'm so excited to announce that it's almost time for the 5th Annual Jen Daly Quilts Christmas Quilt-Along!

In the past I've kept the quilt-along project a mystery, revealing one step at a time with a big finish, but this year I've decided to change things up a bit.  I'm going to give a sneak peek of the project that we're making before the quilt-along begins.  I'm hopeful that having an idea of where we're headed will help you choose a color palette and materials more successfully so that you'll truly love your finished project.

I've also decided to call this year's quilt-along a "stitch-along."  As the name suggests, this project will require a bit more stitching than quilting—perfect for working on by the fire with a glass of eggnog at your side and a Christmas movie playing on the tv.  I don't know about you, but the thought of a little slow stitching and a break from the holiday hustle and bustle is infinitely appealing to me.

So without further ado, allow me to introduce the...

  Merry Little Christmas Stitch-Along!!


Throughout the month of December, we'll be stitching charming Christmas icons and ultimately assembling them into a throw pillow—perfect for your holiday decor.  I made my traditional sample using a variety of felted wools, but during the stitch-along I'll be making a bright and colorful version using solid flannels in place of the wool.  Choose wool, flannel, even printed quilting cottons—whatever you like!


Here's what I'm planning to use for my bright pillow...

I'm using a variety of fabrics from the Vintage Holiday fabric line by Bonnie & Camille for Moda Fabrics:


I'm pairing them with solid flannels in colors inspired by the Vintage Holiday fabrics:


I've chosen embroidery floss in colors to match the flannels I'm using:


And I've gathered some darling buttons and beads to embellish my flannel appliqués:


And just because I'm so excited about how these materials work together, here's a little more eye candy...


Yum!!!


The Merry Little Christmas Stitch-Along will begin on Monday, December 2nd and continue every other day through the month of December, wrapping up on the 22nd.  There's no sign up required for the stitch-along—as we progress, I'll make each pattern or set of instructions available on the blog and on the stitch-along page.  The patterns will remain on the blog/website throughout the month of December and in January I'll make a complete pattern available in my Etsy shop.  I'll also do regular posts on Instagram and Facebook using the hashtag #merrylittlechristmassal.  If you post pictures of your progress, be sure to tag me @jendalyquilts and use the hashtag #merrylittlechristmassal—I'd LOVE to see what you come up with!

To help you get started, here's a link for a printable materials list for the stitch-along.

 Merry Little Christmas Stitch-Along Materials

Have fun gathering materials for the project and if you have any questions, feel free to email me at jendalyquilts@gmail.com.  I'll see you back here on December 2nd!  Can't wait!!

—jen

Wednesday, October 9, 2019

New Patterns for Fall and a Giveaway!

The fall weather and scenery is gorgeous in New Hampshire right now and it's making me want to bake, consume vast quantities of apple cider and donuts, and above all, do some fall quilting!

I've got a couple of new patterns for fall to share with you and, even better, a giveaway!

First off is my Monster Mash quilt.  This little quilt first appeared in American Patchwork & Quilting magazine last fall, but the pattern is now available in my Etsy shop.  This quilt is 19½"—a great size to hang on your front door to greet your trick-or-treaters!


Next up is my brand new pattern Pumpkin Patch.  I love the scrappy pumpkin and Shoo Fly blocks on this one.  It's a super simple pattern—perfect for a beginner.  I made mine for fall, but if you change up the color palette by substituting in some black and purple for the tan and brown, it would be great for Halloween.  The pattern for Pumpkin Patch is also available in my Etsy shop.


And now it's time for the giveaway!  My Holiday Twinkle lap quilt is featured in the current issue of McCall's Quilting magazine and to celebrate, I'm going to give away a copy of the magazine and a little something extra.  


Holiday Twinkle is a fun-to-make sampler quilt that finishes at 66" square—a great size for draping over the arm of a chair or couch or for curling up under with a good book.


I've got a little fabric left over from this project, so I'm also going to give away two little charm square bundles.  Each bundle contains 12 - 5" squares of fabric from the "Merry Starts Here" collection by Sweetwater for Moda—clearly not enough to make the quilt, but definitely enough for a bit of fun! 


For a chance to win, simply look for the giveaway posts on either Facebook or Instagram and enter there.  I'll announce a winner on Monday, October 14th.  Good luck!

—jen

Monday, July 1, 2019

Three New Quilting Projects for Summer

Happy July!  And happy Canada Day to my Canadian friends and family!

In honor of the gorgeous summer weather, I've got three fun summer quilt ideas to share with you today.

First off is "Chirp Crossing."  I live in the country in New Hampshire and this pillow was inspired by the little families of birds that I often see crossing the road and, of course, my own three kids.


You can find the pattern for this 12" x 20" pillow cover featuring paper-pieced bird blocks in the July/August 2019 issue of Fons and Porter's Love of Quilting magazine.  I made my pillow with brightly colored Alison Glass wovens, but you could make this quick project with whichever prints or color palette you chose.


Next up, here's "Beach Day."  For years my family has vacationed on the coast of Maine during the summer and I can never get enough of the beach.  This quilt was my attempt to bring the beach back home so I could enjoy it every day.


Beach Day originally appeared as the July quilt in the 2018 American Patchwork & Quilting Calendar, but the pattern is now available for download in my Etsy shop.


All of the Beach Day blocks are fun and easy to make, but my favorite part of this quilt is the gradation of the sea and sky.  I used a range of blue and tan Buggy Barn Basics fabrics to create the gradation in my quilt.


And finally, here's my "Sunflowers" table runner—one of my all-time favorite summer quilts!


This pattern has been available in my Etsy shop for a while, but because I received so many requests, I've just released a new version of the pattern with information for making four larger sizes of the quilt.  The new and improved pattern includes material requirements, cutting instructions and quilt assembly information and diagrams for the following quilt sizes:


My daughter is in the midst of making the 63" x 78" long lap quilt and I'll be sure to post a picture of her quilt when it's finished!


If you're looking for more summer quilting projects, check out the summer collection in my new book "Stitching for the Seasons."  Inside you'll find patterns for a pillow, a mini quilt, a table runner, a lap quilt and a Little House wallhanging—not just for summer, but for all four seasons.

In the meantime, enjoy the sunshine!!

Little House—Summer from "Stitching for the Seasons"


Tuesday, May 21, 2019

International Quilt Market Spring 2019

I'm just back from attending my very first International Quilt Market and my head is spinning from the experience!  But having had a bit of time to process and look over my hundreds of photos, here are my 5 biggest takeaways from Market.

1.  Starstruck!

I arrived in Kansas City on Wednesday evening and after checking into my hotel, my first order of business was to get my bearings and scope out the Convention Center.  So I pressed the button to call the elevator and the doors opened to reveal Bonnie and Camille.  As in the amazing mother-daughter team of Bonnie Olaveson (Cotton Way) and Camille Roskelley (Thimble Blossoms)!  I walked with them to the Convention Center and they were both so lovely and kind.  They left to begin work on their booth and I left the Convention Center more than a little starstruck, and that was just the beginning!

In no particular order, here are some of the other amazing designers/quilters/teachers/authors that I encountered at Market.  Some I heard speak, some I saw from a distance, but all made me feel like a giddy fangirl.

Pat Sloan
Victoria Findlay Wolfe
Jo Morton
Gail Pan
Jenny Doan
Jan Patek
Dawn Heese
Bonnie Sullivan
Corey Yoder
Sherri McConnell
Robin Pickens
Alison Glass
Amy Smart
Edyta Sitar
Weeks Ringle
Tula Pink

2.  Creativity

Walking the floor of Market was an amazing experience.  The sheer amount of creativity on display was overwhelming, but inspiring.  Each booth had its own distinctive look and feel and you never knew what you'd find when you turned a corner.  Here are a few of my favorite booths:

Joy's Studios little cafe scene — I was in Paris a couple of months ago and now I'm a sucker for all things Parisian!

Tilda's booth.  The quilting on the plum and sage green quilts was outrageous!

Jillily Studio's farmer's market scene was charming, right down to the baskets of berries on the farm stand.

Elizabeth Hartman's booth—how cute and colorful is this?!  I loved the cascading leaves.
I loved the quietly colorful work of Kori Turner-Goodhart of Olive Grace Studios.
3.  Color

There was color everywhere at Market, both pastel and brilliant, but the color that I noticed most was orange!  I'm not sure if I was just in an orange state of mind—let's be honest, I was feeling pretty happy—but I felt like I saw shades of orange everywhere.  My mom will be thrilled—orange is her favorite color!!

Corey Yoder's "Sugarcreek" (Moda)

Gabrielle Neil Design Studio's "Midnight Rose" (Riley Blake)

Sherri & Chelsi's "Harper's Garden" (Moda)

Cotton + Steel

Robin Pickens' "Painted Meadow" (Moda)

Heather Mulder Peterson of Anka's Treausres' "Wildflower Bouquet" (Riley Blake)

4.  Butterflies and Flowers

The shapes I noticed everywhere, and granted it was "Spring" Market, were butterflies and flowers.  Here's a sampling of what I saw:

"Take Flight" quilt pieced by Natalie Crabtree and quilted by Holly Seever.

See the butterflies in the center quilt?  And look, half of them are orange!

Lori Holt's "Granny Chic (Riley Blake)

Free Spirit's "Tropical Flora" quilt featuring Tula Pink's "Monkey Wrench"

Amanda Murphy's "Nightingale" (Contempo Studios)

Free Bird Quilting Design's "Indha Blossoms" quilt featuring Indha Batkis from Me+You (Hoffman Fabrics).

5.  Kindness

Perhaps my biggest takeaway was the kindness I encountered at Market.  C&T Publishing and EE Schenck were kind enough to host book signings for me and their reps at Market were generous and supportive.  The many exhibitors, designers, shop owners and industry professionals I met were friendly and enthusiastic — eager to share their time, knowledge and experience.  And the people of Kansas City, a city I've never visited before, were warm, welcoming and accommodating. 

That's me at the EE Schenck booth with the summer collection from my book, "Stitching for the Seasons".

I knew I'd come away from Market inspired by the quilts, but I didn't expect to be so inspired by the people.  Two days after I met Bonnie and Camille in the elevator, I finally had an opportunity to find their booth on the Market floor.  And as I walked toward their booth, amidst the crowds and the noise, they actually called out to me by name.  I felt surprised, pleased and as I so often do as a member of the quilting community, grateful.

—jen