Wednesday, October 28, 2015

Call Me Miss October

That's right, "Miss October!"  I'm a calendar girl again!  Don't worry, I'm not that kind of calendar girl -- can't quite pull that off -- but I am the kind of girl with a quilt in a calendar.

It's American Patchwork & Quilting's 2016 Calendar, to be specific, and it is gorgeous!  The calendar features 12 beautifully photographed projects that range in size from a sweet little Easter table mat, to full-size bed quilts.  


And here's my quilt, "Glow in the Dark."


"Glow in the Dark" is a scrappy Halloween quilt that looks great hanging on a wall or displayed on a table.


This quilt is one of my all time favorites.  I especially love how the variety of orange and purple fabrics seem to sparkle in contrast with the black.


And while the quilt is 30" x 30", the small pinwheel, star, and shoofly blocks give it a charming, miniaturesque feel.  By the way, if "miniaturesque" is not a word, it should be!


If you'd like to make your own version of "Glow in the Dark," American Patchwork & Quilting's 2016 Calendar is now available online through the Meredith Store.  Detailed instructions and patterns for all of the quilts are included in a full-size and full-color supplement.


Happy quilting and Happy Halloween!


Thursday, October 8, 2015

Apron Strings - Free Charm Pack Pattern

Don't you just love charm packs?!  A tidy little package of perfectly trimmed 5" squares and a guilt-free way to own an entire fabric collection -- what could be better?  If you're like me, though, eventually your charm pack collection will start to pile up and you'll realize it's time to cut one from the herd.  When that time comes, you're going to need a charm pack pattern!

Today my quilt, Apron Strings, is a featured recipe at the Moda Bake Shop.


Apron Strings is a sweet little 12" x 32" table runner made with, you guessed it, a charm pack and ⅔ yard of a coordinating fabric -- perfect for when your charm pack collection becomes a bit unwieldy. 

And Apron Strings couldn't be easier!  It features simple piecing and machine quilting -- great for a beginner or a weekend project.


I made Apron Strings with the beautiful "Hyde Park" collection by Blackbird Designs for Moda and I love the fabrics!  Somehow they manage to be both colorful and muted at the same time.  They give my quilt the soft, nostalgic feel that I was going for.

But if you're wondering how Apron Strings would look in a different color palette, here's another, brighter version made with "California Girl" by Fig Tree Quilts for Moda:


Love this one too!  It's got a summery, kitchen-y, retro vibe that I really like -- also nostalgic, but in a totally different way.

If you'd like to make your own Apron Strings table runner, head over to Moda Bake Shop for my free tutorial.  It's the perfect opportunity to pare down your charm pack stash, or the perfect excuse to invest in a new charm pack.  Your decision -- this is a judgement-free zone!!

Happy Quilting!

Wednesday, September 16, 2015

Hello Fall!

It's hot outside now, but this morning I went for an early run while it was still cool AND before I could talk myself out of it.  Good decision -- the soft air smelled spicy, the breeze tossed about a few brightly colored leaves, and the elk were bugling in the distance.  Yes, you read that right -- elk.  I'm lucky enough to live near a trail that runs alongside Corbin Park, a 20,000 acre private game preserve (read hunting club -- this is, after all, New Hampshire) that I prefer to think of as a wildlife refuge.

Once upon a time, Corbin Park was stocked with several varieties of deer, moose, antelope, caribou, wild boar, elk, bighorn sheep, and even bison!  Sadly, most of the animals not indigenous to NH did not thrive in the park, but the park is still home to deer, wild boar, and elk.  The deer and wild boar keep mostly to themselves, but in the early mornings and evenings of September, the elk bugle.  It's an amazing, eerie sound, startling to hear in the woods, and for me, a sure sign of fall.

I came back from my run invigorated and inspired and while the official start of fall is still several days away, I decided that today was definitely the day for the latest installment in my framed mini quilt series.

If you're new to my blog, first came spring:


Then came summer:


And here is, you guessed it, fall!


To make your own little fall quilt, you'll need:

Border print:  10" x 10" - cut (2) - 2" x 4½" and (2) - 2" x 9½"

Blue background print:  10" x 10" - cut (1) - 3" x 6½"; (21) - 1¼ " x 1¼ " squares to cover the blue sections of the leaf blocks; and (4) - ⅞" x 2"

Red and orange prints:  1¼" x 9" strip of each of three prints - from each, cut (7) - 1¼ " x 1¼ " squares to cover the colored sections of the leaf blocks

Brown print:  ¾" x 4" - cut (3) - ¾" x 1¼ " to cover the stem sections of the leaf blocks

Batting:  9" x 11"

Also needed:
Washout or disappearing ink marking pen, spray basting adhesive, tan embroidery floss (I used DMC's #869), three little leaf buttons, and a 5" x 7" frame


To make the leaf blocks:

Once again, I chose to paper piece the 1½" x 1½" leaf blocks.  Tiny, I know, but so worth it!  Just make sure you follow the printed numbering on the block units (i.e. start with A1, B1, and C1) and you should be all set.


You'll need to print or copy three sets of foundation patterns (and you can find the pattern here).  Each little unit should measure ½" x 1½" from solid line to solid line -- 1" x 2" from outer dotted line to outer dotted line.  If you're concerned about color placement, it might help to use colored pencils to color the various sections of each block unit before stitching.  For each block, sections A1, A3, A5, B1, C1, C3, and C6 should be covered with blue fabric; sections A2, A4, B2, B3, B4, C4, and C5 should be covered with your leaf fabric; and C2 should be covered with the brown print.

After stitching units A, B, and C together for each block, press the seams open to reduce bulk (note:  remove the paper from behind the leaf blocks after stitching and before pressing).  Make three blocks.

If you're not used to paper piecing, here's a link to a Fons and Porter tutorial that should get you started.


To assemble the quilt top:

Referring to my quilt, lay out your three leaf blocks and the four ⅞" x 2" strips of blue background fabric.  Stitch them together and press the seams towards the blue strips.  Then stitch the blue 3" x 6½" to the top of the row of leaves and press towards the blue 3" x 6½".  Stitch a border print 2" x 4½" to either side of the quilt center, pressing towards the border.  Finally, stitch a border print 2" x 9½" to the top and bottom of the quilt center, pressing towards the border.  Press the finished quilt top well.


To finish the quilt top:


Using a washout or disappearing ink pen, trace the "Hello Fall" lettering (find the template here) onto the quilt top -- the embroidery template should measure 2½" x 6".  Lightly spray basting adhesive to the 9" x 11" piece of batting and smooth the quilt top over it, right side up.  Use two strands of embroidery floss and a back stitch for the lettering.  Stitch the three leaf buttons in place and use one strand of embroidery floss or thread and a running stitch for the leaf trails.


To insert the quilt into the frame:

After you finish stitching, trim the batting even with the edges of your quilt.  Remove the contents of your frame, center the glass behind the quilt top, and wrap the edges of the quilt around it.  Reinsert the glass and quilt into the frame, fold down the quilt's corners, and put the back of the frame in place, taping with masking tape if necessary to keep it closed.  Voila!


Happy quilting and Happy Fall!


Thursday, August 27, 2015

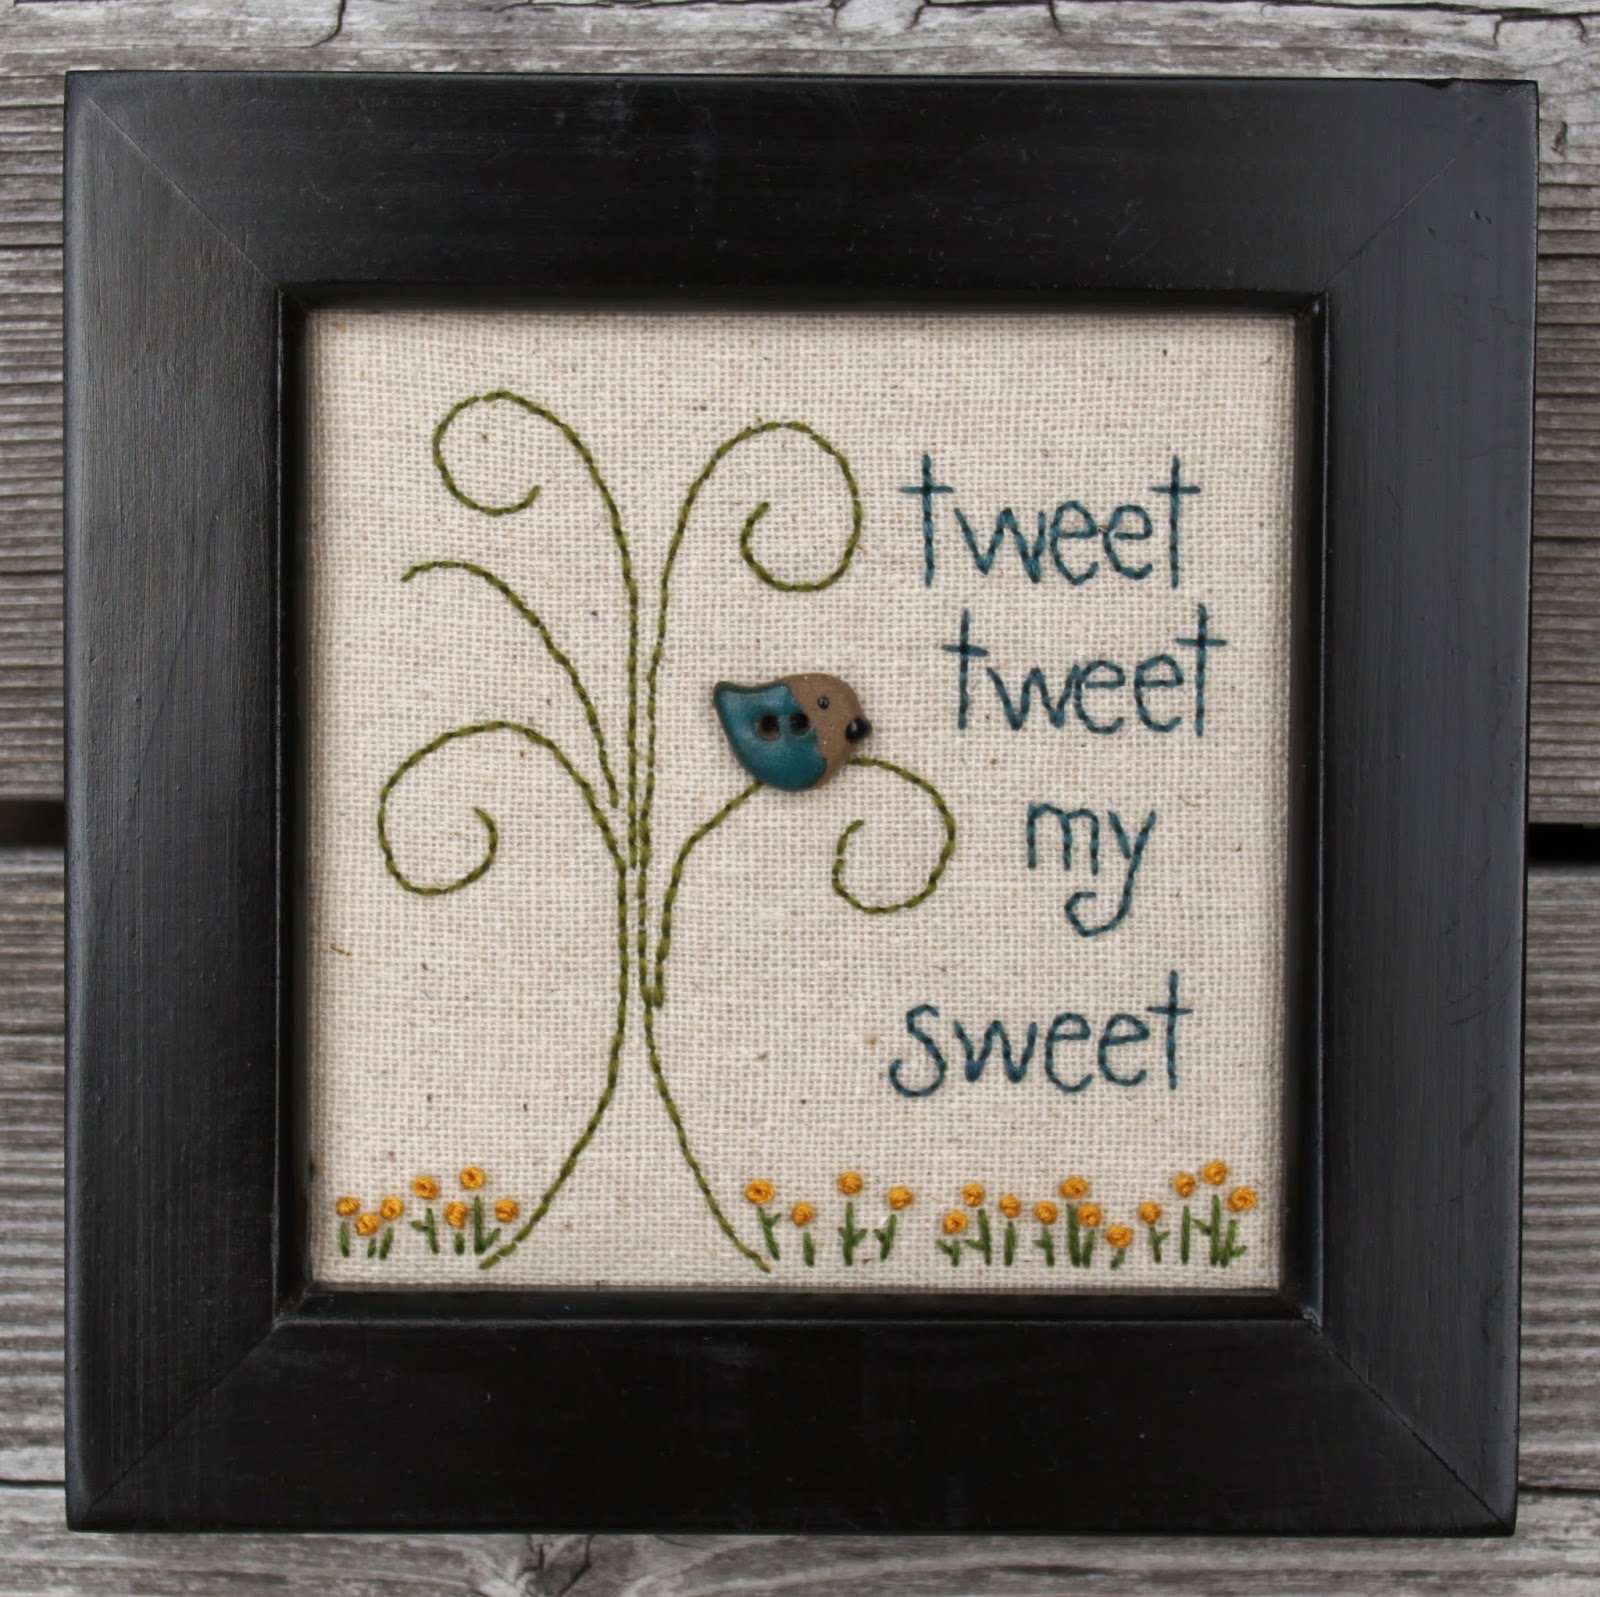
Tweet, Tweet, my Sweet - Free Pattern

So apparently I only post once a month in the summer!  Sadly I've had very little time to blog lately.  Maybe it's because I've been spending every waking moment in the car.  OK, not every moment, but this past month I've driven to Boston three times, to NYC, to Toronto, and to a teeny town in northern Vermont.  I've waited in the car for hours while my boys did a skating clinic at a rink 1½ hours from home and I've spent the last two weeks carpooling for two-a-day soccer practices.

I don't mind the actual driving, but the waiting was becoming brutal.  I mean how much time can you actually spend on your phone?!  My solution—stitching!  Embroidery is fast, easy, portable, and good for your blood pressure.  I don't have the scientific data to back this statement up, but it definitely works for me.

Here's my latest project:


All you need is a 6" x 6" piece of background fabric, blue, green, and yellow floss, and a little bird button.  After tracing the design onto the background fabric using a disappearing ink pen and a light box, I used spray basting adhesive to baste the woven background fabric to a 6" x 6" piece of white flannel.  You don't have to do this step, but the flannel prevents the floss ends from showing through the background fabric and it doesn't add much bulk—great if you plan to frame your work.

I used two strands of floss for all of the stitching and a backstitch for the tree and lettering.  The yellow flowers are made with french knots and their stems and leaves are made using a long straight stitch.

I chose to frame my little project because I made it as a gift for my amazing sister-in-law, Leisa, but I think it would also be cute made into a little pillow with a floral border.  If you decide to frame yours, you'll need a square frame with a 4" x 4" (or slightly smaller) opening.

Here's the pattern:


When you print/copy this template, the outer square should measure approximately 5" x 5".  The background fabric dimensions that I gave you are slightly larger to allow for squaring up, framing, etc. so just center the pattern on your fabric square.

Hope you have fun stitching this sweet little project!  Your heart will thank you!

Friday, July 31, 2015

You Reap What You Sow

This morning I woke up at 5:00 and my first thought was that today was the last day of July.  Poof!  Just like that, another month has gone by.  And while I have been busy with two vacations, summer camps, two pattern deadlines, and college visits, I have not been blogging or, even worse, quilting.  But in the midst of the chaos, and with a little help from Mother Nature, I have been creating.


First there were the radishes...


My family, however, is not too keen on radishes, and so, not wanting to waste them, I tried making radish pickles.  These were great for the first few days -- peppery and spicy, perfect on a burger -- but when the fridge started to smell like pickled radishes, we had to let them go.


Next came the green beans.  They were unbelievable sauteed with garlic and balsamic vinegar.  Didn't throw any of these away, and we're eagerly awaiting the next batch.


We have a bumper crop of zucchini, and I know just what to make with the extras -- zucchini nut bread.  Yum!.


The tomatoes should be ripening soon and the marigolds I planted around the tomato plants have done their job and kept the pests away.  Can't wait to eat these with the basil I'm growing and some fresh mozzarella.


Still waiting on the beets...


...and the carrots.


I can't believe how much you can harvest from a little 4' x 12' raised bed garden and I can't believe I've waited so long to give this a try!


Happy sowing!

Monday, June 22, 2015

It's Summer! - Free Pattern

It's officially summer!  And to celebrate the season, I'm sharing a pattern for a quick little framed quilt AND my favorite pie recipe.  It's a twofer (and by the way, I looked it up: "twofer" is actually a word!).

Remember my " Think Spring" quilt:


Well it's obviously time to put it away, but I think my kitchen windowsill would look pretty naked without a framed quilt on it now, so I decided to make a summer version:


Once again, the quilt fits into a 5" x 7" frame and the unfinished quilt top dimensions are 7½" x 9½"- seems a little big for a 5" x 7" frame, but the extra size is to help you wrap the quilt around the frame's glass insert.


To make your own little quilt, you'll need:

Border (stripe) print:  10" x 10" - cut (2) - 2" x 4½" and (2) - 2" x 9½"

Muslin (I used a primitive muslin):  10" x 10" - cut (1) 3" x 6½" and (24) - 1¼" x 1¼" squares to cover the muslin sections of the star blocks

Red and blue prints:  1¼" x 6½" strip of each of four prints

Batting: 9" x 11"

Also needed:
Washout or disappearing marking pen, spray basting adhesive, blue embroidery floss, metallic gray floss (I used DMC's E317), black embroidery floss, and a 5" x 7" frame


To make the star blocks:

I chose to paper piece the 1½" x 1½" star blocks.  When I'm working on a miniature scale, I find paper piecing to be easier and more accurate.  The star block has three units, but if you make sure to follow the printed numbering (ie. start with A1, B1, and C1 for each unit), the units nest together nicely.


Print out or copy four sets of foundation patterns (find the template here) and make sure that each little unit measures ½" x 1½" from solid line to solid line -- 1" x 2" from outer dotted line to outer dotted line.  Make four blocks.  Note:  when stitching units A, B, and C together for each block, press the seams open -- to do this, you'll want to remove the paper from behind the star blocks before pressing.

Once again, here's a link to a great Fons and Porter paper piecing tutorial if you need a little brushing up on how to paper piece.


To assemble the quilt top:

After making the four star blocks, stitch them together horizontally and press the seams open.  Then stitch the muslin 3" x 6½" to the top of the row of stars and press towards the muslin 3" x 6½".  Stitch a striped 2" x 4½" to either side of the center unit, pressing towards the stripe.  Finally, stitch a striped 2" x 9½" to the top and bottom of the center unit, pressing towards the stripe.  Press the finished quilt top well.


To finish the quilt top:

Referring to my framed quilt and using a washout or disappearing pen, trace the "Summertime," dragonfly, and dragonfly trail onto the quilt top.  Then lightly spray basting adhesive to the 9" x 11" piece of batting and smooth the quilt top over it, right side up.  I embroidered with the batting in place to give the stitching some dimension and to keep the floss ends from showing through the quilt.  Note:  if you decide to use a vanishing ink pen, just remember that the summer humidity may cause the ink to disappear quickly so you may want to embroider the quilt immediately after marking it and in one sitting.


FYI, the above embroidery template should measure 2½" x 6" (find the template here).  Use two strands of floss and a back stitch for the lettering.  The dot above the "i" is a french knot.  I used one strand of black floss and a running stitch for the dragonfly's trail, two strands of black floss and a back stitch for his body, and two strands of metallic floss and a lazy daisy stitch for his wings.  Here's a close-up of the dragonfly to help you out:


To insert the quilt into the frame:

After you finish embroidering, trim the batting even with the edges of your quilt.  Remove the contents of the frame.  Center the glass behind your quilt top and wrap the edges of the quilt around it.  Reinsert the glass and quilt into the frame, fold down the quilt's corners and put the back of the frame in place, taping if necessary to keep it closed.  Done!


I chose to make my quilt using a patriotic color palette, but I've been thinking that it would also be really cute in beachy colors with a weathered white frame:


Your choice!


And now for the pie recipe:  it's a Strawberry-Rhubarb-Raspberry pie that I found in an old issue of "O" magazine and it is amazing!!  I love traditional strawberry-rhubarb pie, but the addition of the raspberries really elevates this pie to an entirely different level.  I made this one yesterday and, despite wanting to consume it entirely by myself, I served it to my family with vanilla ice cream.  Bliss.


Summer quilts, summer pies!  Don't you just love summer!

Thursday, June 11, 2015

Christmas Baubles Quilt

What a gorgeous day here in New Hampshire!  It's so sunny and blissfully warm that Christmas seems a long way off, but I suppose it's never too early to at least start thinking about your Christmas quilting projects.

If you're looking for a fun and easy project (or an excuse to buy some Christmas fabrics!), try my Christmas Baubles quilt!  It's my latest recipe for the Moda Bake Shop and the free tutorial is featured at the Bake Shop today.


I have to say, I really love this sweet little project!  The combination of miniature Christmas ornament blocks and Kate Spain's colorful and cheerful "Jingle" fabrics just makes me happy.

Christmas Baubles is a very easy project.  It's perfect for a beginner and definitely doable in a weekend.  To make the quilt, you'll only need a single mini charm pack of Christmas fabric -- and Moda has some really gorgeous Christmas fabrics coming out this summer -- 2/3 yard of a background fabric, a scrap of gray fabric, and a yard of backing/binding fabric.  Once you have all of your ornament blocks made, the quilt comes together very quickly.  


I wanted this project to be fast and something that any quilter could finish at home, from soup to nuts, so I decided to try to quilt it on my regular old sewing machine.  I used a ruler and a vanishing marking pen to mark a tree shape that outlines the ornament blocks.  After stitching the tree, I then marked and stitched vertical lines in the background of the quilt.  The quilting went pretty quickly and I couldn't be happier with the results!  Just don't forget to be sure that the marking pen you choose comes out of your background fabric before you mark your quilt!!

So there you have it, a little taste of Christmas in June.  I hope Christmas Baubles fills you with inspiration, not anxiety.  And just in case you're wondering, there are 196 days until Christmas.  Plenty of time!!