Tuesday, December 15, 2015

Peace on Earth - A Mystery Quilt - Day 8

It's December 15th and Day 8!  Time to turn off your sewing machine, make a cup of tea, and find a comfy chair, because today we are going to embroider.

I love embroidery!  I find the slow, rhythmic pace therapeutic and even though I typically use only simple stitches, I think that patchwork paired with embroidery is a killer combination.  So here we go!


Today you'll need:

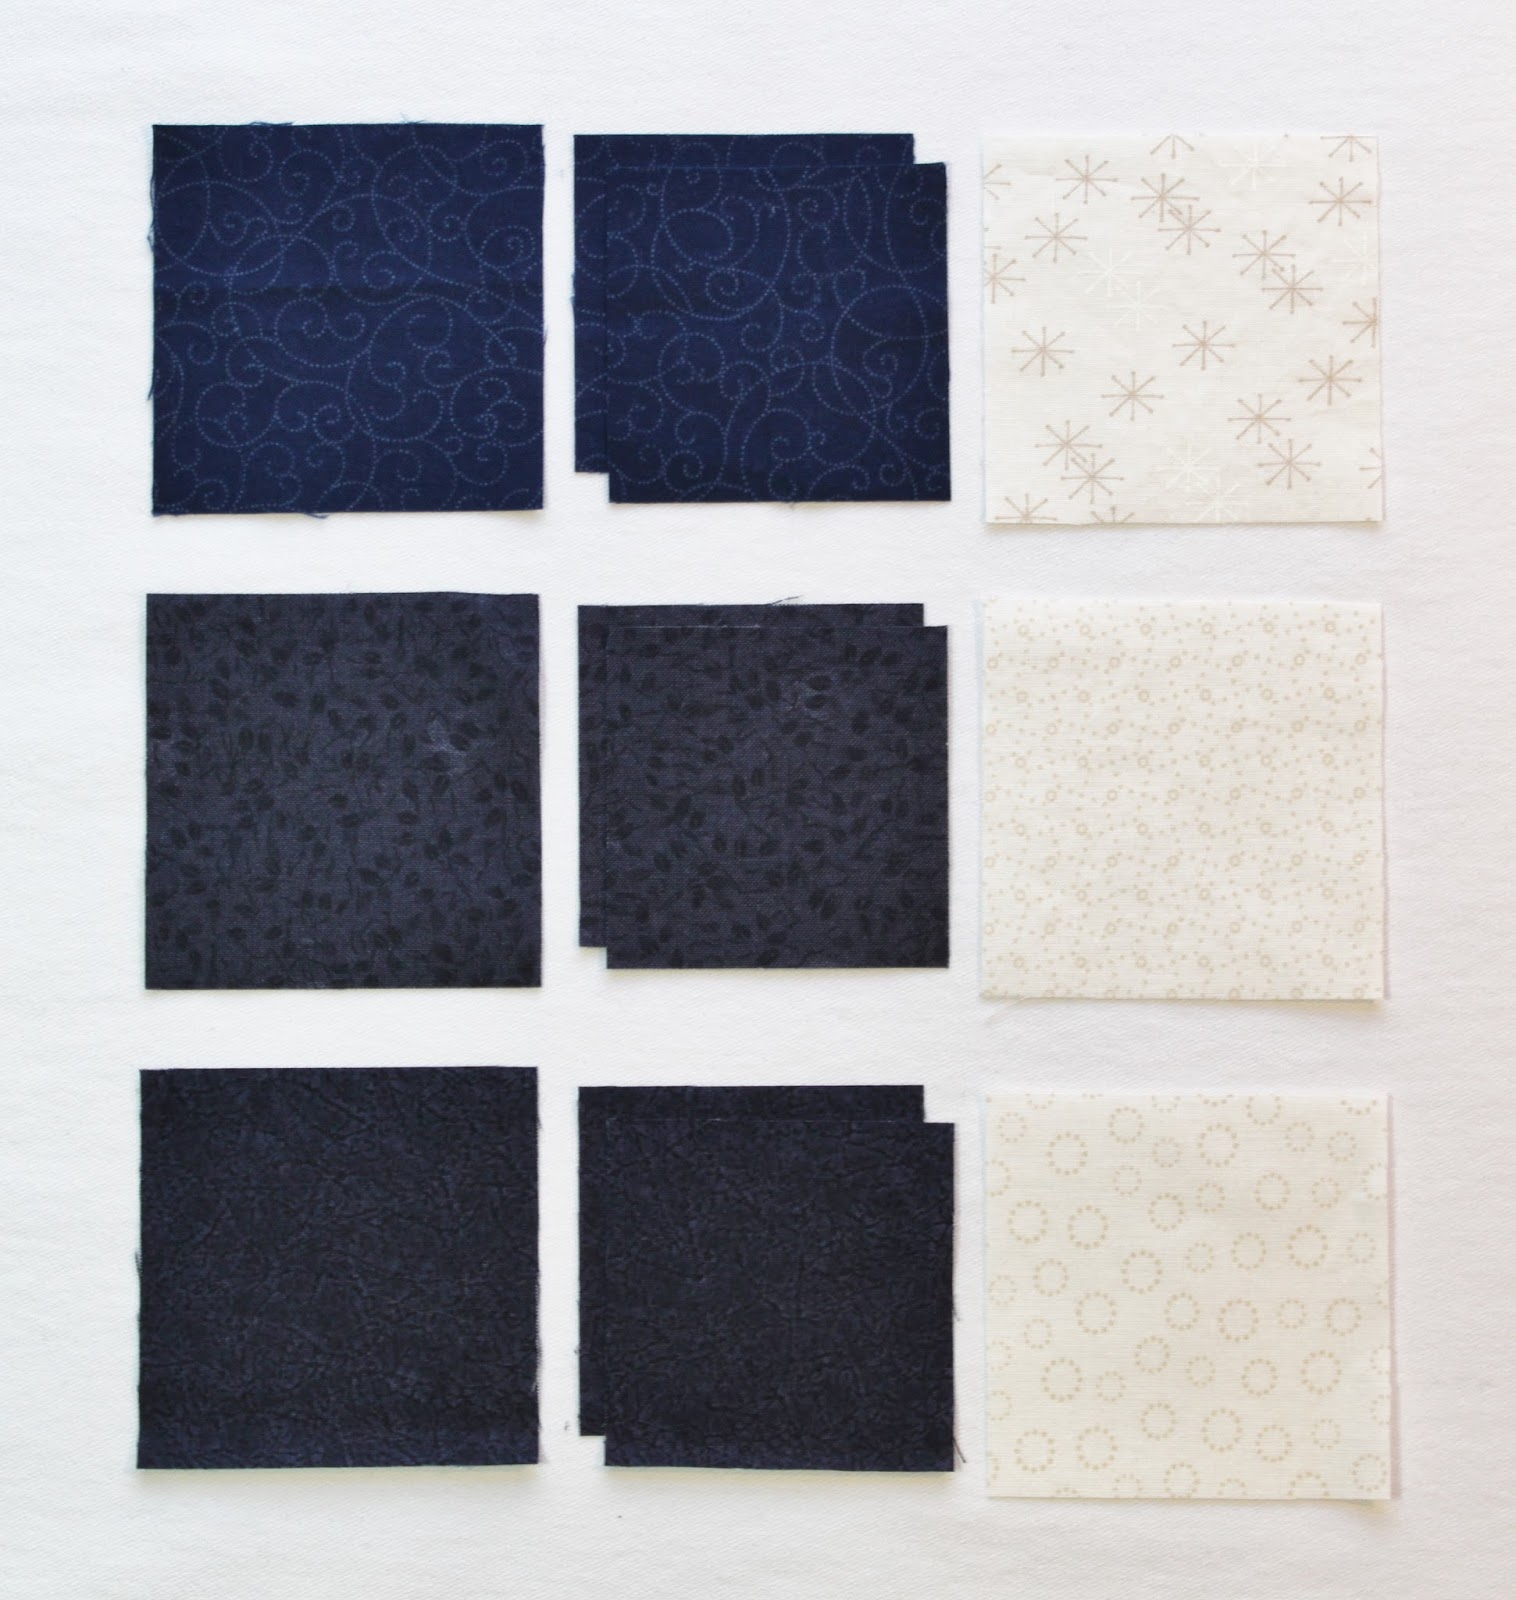
Dark Blue Print:
2 -- 3½" x 14½" rectangles (these can be cut from the same fabric or from two different fabrics)

brown embroidery floss or size 8 perle cotton


We're going to be embroidering a brown vine onto our dark blue print rectangles -- click here for the pattern.  I drew dotted lines on the pattern to help you center the vine on your fabric rectangles.  Don't worry that the vine doesn't extend the full length of the fabric, we'll be adding more to this component later on.

I used a light box to help transfer the pattern onto my fabric.  Don't have a light box?  Try holding your fabric and pattern up to a window or placing a lamp under a glass table or you could use transfer paper -- there are no rules here.  Transfer the vine pattern onto one rectangle and then flip the pattern over before transferring the vine onto the second rectangle.  Here's what you should end up with:


And now the fun part!  To embroider the vines, use either two strands of brown embroidery floss or one strand of brown size 8 perle cotton and a back stitch.  The back stitch is one of my faves.  It's a fast stitch and perfect for vines, stems, and lettering.  If you're not familiar with the back stitch, click here to check out DMC's excellent embroidery stitch guide for instructions.

Just a quick note:  I don't always use an embroidery hoop when embroidering, but because these rectangles are relatively small and not stitched to anything else yet, I'd suggest using a hoop for this step.  The hoop will keep your fabric taut and help you to make even, flat stitches.  After you're finished stitching, lightly press the dark blue rectangles from the wrong side.

And voilà!  Your finished vines should look something like this:


Fun, right?!  Next time we'll try out some wool appliqué -- yum!!

Sunday, December 13, 2015

Peace on Earth - A Mystery Quilt - Day 7

It's Day 7 and our last day of piecing blocks.  Today we're going to work on one of my all-time favorite blocks -- the Sawtooth Star.

Here's a Sawtooth Star in the colors we're going to be using today.


But we're actually going to do something a little bit different.  We're going to make the components for two Sawtooth Stars, but we're not going to finish the blocks just yet.  We'll be making...

Two of these:


And one each of these:


For each of your two "almost" Sawtooth Stars, you'll need:

Red Print:
1 -- 2½" x 2½" square

Green Print:
8 -- 1½" x 1½" squares

Dark Blue Print:
3 -- 1½" x 1½" squares
4 -- 1½" x 2½" rectangles


Assemble Sawtooth Star Blocks:
1.  On the wrong side of each green print 1½" x 1½" square, use a ruler and pen or pencil to mark a diagonal line from corner to corner.


2.  Layer a green print 1½" x 1½" square atop the left side of a dark blue print 1½" x 2½" rectangle as follows:


3.  Stitch along drawn line, press seam open towards the green print, and trim seam allowance to ¼".


4.  Layer a second green print 1½" x 1½" square atop the right side of the unit created above as follows:


5.  Stitch along drawn line, press seam open towards green print, and trim seam allowance to ¼".


6.  Your finished flying geese unit (aka the side of a Sawtooth Star block) should measure 1½" x 2½" (sorry about the low contrast photos, I was working at night!).  Repeat steps 2-5 to make 4 flying geese units for each Sawtooth Star block (that's 8 total).


7.  Lay out one flying geese unit and 2 dark blue print 1½" x 1½" squares as follows (daytime photos, yay!).  Stitch together and press seams towards the dark blue print.  Make one of these units for each Sawtooth Star block (2 total).


8.  Lay out one flying geese unit and 1 dark blue print 1½" x 1½" square as follows.  Stitch together and press seam towards the dark blue print.  For your second Sawtooth Star block, make the same unit, but stitch the dark blue print 1½" x 1½" square to the left side of the flying geese unit.  If this is confusing make sure to read to the bottom of the instructions to see a photo of the end result.


 9.  Lay out two flying geese units and 1 red print 2½" x 2½" square as follows.  Stitch together and press seams towards the red print.  Repeat for second Sawtooth Star block.


10.  Lay out units created in steps 7 and 9 above as follows.  Stitch together and press seam towards the red print.  Repeat for second Sawtooth Star block.


You should end up with the following:


Strange, I know, and hard not finish off these pretty little blocks, but trust me, I've got a plan!


As I mentioned in my first post, we'll be doing some simple embroidery and wool appliqué with this project, and I thought it might be helpful for you to know what materials you'll need.


We'll be using red, green, blue, ecru, and gold embroidery floss.  I used DMC's #221 (red), #936 (green), and #796 (blue).  The gold I used was a variegated Valdani floss that I had lying around.  I also used some size 8 DMC perle cotton in brown (#898), green (#937), and red (#815) because I happened to have them on hand, but you can absolutely use all embroidery floss -- it's cheaper and much more accessible.

For the wool appliqué we'll be using green...


and brown...


You won't need much wool -- a 2½" x 6" piece of green and a 2½" x 8" piece of brown should do.  I actually used scraps of different green and brown wools, but this is not necessary.  And if you don't have access to wool, feel free to substitute flannel or quilting cottons.

Finally, you'll need 10 red buttons.  I used a variety of ⅜" and ⁷⁄₁₆" buttons, but if you prefer, all of your buttons can be the same -- whichever is easiest for you.


That's it for today!  Enjoy your Sunday and happy quilting!

Friday, December 11, 2015

Peace on Earth - A Mystery Quilt - Day 6

Welcome back!  Today is Day 6 and we're making Double Pinwheel blocks.  No half square triangles today, I promise!!!

Here's what the Double Pinwheel block looks like:


And here's another EQ sketch of a Double Pinwheel block with a third color thrown in to give you an idea of how it's constructed:


The Double Pinwheel is a great block because you can achieve so many different looks just by moving the colors around.  See how the white in the block above looks like a white square in the background.  


Here's the same block with the blues reversed.  Notice how the white pinwheel seems to advance in this block because there isn't as much contrast between the white and the lighter blue vs. the darker blue.


And check out this coloration!  Moving the white to the outside in the block below really makes it look like a pinwheel.


So much fun!  But I digress.  The block we are working on today will look like this:


It's not quite as splashy with just two colors, but it does resemble a snowflake and that's what we're going for.  Here's how you make a Double Pinwheel Block:

For each of our three 3" x 3" (finished) Double Pinwheel Blocks, you'll need:

Dark Blue Print:
1 -- 2¾" x 2¾" square
2 -- 2⅜" x 2⅜" squares

Ivory Print:
1 -- 2¾" x 2¾" square


Sub-Cutting Instructions: 
1.  Cut all dark blue and ivory print 2¾" x 2¾" squares in half diagonally and in half diagonally again to form four triangles.
2.  Cut dark blue print 2⅜" x 2⅜" squares in half diagonally once to form two triangles.  

The following photo shows what patches you should have for each Double Pinwheel block:


Assemble Double Pinwheel Blocks:
1.  Each Double Pinwheel block will be assembled as a four-patch block.  Lay out one large dark blue print triangle (created in step 2 above), one smaller dark blue print triangle (created in step 1 above), and one ivory print triangle (created in step 2 above) as follows:


2.  Stitch together smaller dark blue print triangle and ivory triangle.  Press seam towards dark blue print.
3.  Stitch together above unit and larger dark blue print triangle to form one corner of each block.  Press seam towards dark blue print.  Trim unit to measure 2" x 2".
4.  Lay out four units created in steps 1-3 above as follows:


5.  Stitch units together in rows.  


6.  Stitch rows together.  Repeat to make three Double Pinwheel blocks that should measure 3½" x 3½" unfinished.


Lovely Double Pinwheel blocks all in a row.  Well done you!

One more day of piecing blocks and then we're moving on to something new -- can't wait!

Wednesday, December 9, 2015

Peace on Earth - A Mystery Quilt - Day 5

Good morning and welcome to Day 5!

Today we're moving back to traditional piecing and making Shoo Fly blocks....


I love Shoo Fly blocks -- the name is adorable and they couldn't be easier to construct.  Today will be a piece of cake!


For each of our two 3" x 3" (finished) Shoo Fly blocks, you'll need:

Ivory print:
2 -- 2" x 2" squares (so that's 4 total)
1 -- 1½" x 1½" square (2 total)

Dark blue print:
2 -- 2" x 2" squares (4 total)
4 -- 1½" x 1½" squares (8 total)


Assemble the HSTs (again!!  You're going to be an expert at making HSTs!!):
1.  Gather two sets of two ivory print 2" x 2" squares and two dark blue print 2" x 2" squares.
2.  On the wrong side of each of the ivory print 2" x 2" squares, use a pencil or pen to mark a line a scant ¼" from either side of the true diagonal of the square.


3.  With ivory print 2" x 2" square layered atop dark blue print 2" x 2" and right sides together, stitch along drawn lines.


4.  Use a rotary cutter to cut along the true diagonal to make two triangle units.


5.  Press seams towards the dark blue print.


6.  Trim HST units to 1½" x 1½".  Repeat with remaining ivory print and dark blue print 2" x 2" squares.  Each of the two Shoo Fly blocks will take four HST units.


7.  Now the fun part.  For each Shoo Fly block, lay out four HST units, four dark blue print 1½" x 1½" squares, and one ivory print 1½" x 1½" square as follows.


8.  Stitch HSTs and squares together into three rows.  For all three rows, press seams towards the dark blue squares.


9.  Stitch rows together and voilà, Shoo Fly blocks!


Your two Shoo Fly blocks should measure 3½" x 3½" (unfinished).


Kind of resemble snowflakes, don't they?  Hmmm.....


Monday, December 7, 2015

Peace on Earth - A Mystery Quilt - Day 4

It's Day 4 and we're paper piecing again!  Today's block is a little bit more involved than the pine tree we did on Day 3.  It's comprised of four sections that you'll paper piece separately and then stitch together to create the final block.

Without further ado, here's the link to the foundation pattern for today's block and an EQ sketch of what the block will look like when it's finished:


Here are my four paper pieced sections:


And my final block!

The final block should measure 6½" x 6½" unfinished.  I used a couple of my lighter dark blues for the blue around the roof and put the darker of the two in the chimney section of the block.

And that's it!  Just to review, we've now made three friendship stars, 10 HSTs, one pine tree, and one cabin:


Think you know where we're headed??  

On Day 5 we'll be using traditional piecing to make another one of my favorite simple blocks.  Can't wait!!