Monday, November 28, 2016

2016 Christmas Quilt-along Coming Up!

I've finally emerged from my pie-induced coma and, as promised, it's time to get ready for my 2016 Christmas Quilt-along!

I'm calling it a "Quilt-along" this year, rather than a mystery quilt, because we'll actually be assembling the quilt top by the middle of the month and spending the last week before Christmas embellishing it with embroidery.  We'll be using both traditional and paper piecing again this year, and the embroidery will be very simple—perfect for the confident beginner to intermediate quilter!  I can't wait to get started!

Here's what you'll need for this year's quilt:

    
  • 6 Fat Quarters - 3 green prints and 3 red prints (I'm actually substituting a pink FQ for one of the reds because I'm going for a Christmas candy kind of look)
  • 1 6" x 6" square gray print (mine looks like a solid, but it's actually got a subtle print)
  • 1 yard background fabric (mine is the white/pink micro dot.  All of the embroidery we'll be doing is on the background fabric, so you'll want to choose a background fabric that the embroidery will show up against—nothing too busy, think subtle print—and if you can't find a print you like, a solid white will work just fine!!)
  • 1 yard backing fabric
  • ⅓ yard binding fabric
  • 34" x 40" piece batting
  • embroidery floss to match your fat quarters (mine are (from top to bottom) DMC's 817, 666, 3832, 937, 470 and 166).
It will also be helpful to have a washout marking pen, embroidery hoop and needles, and basting spray.

I mentioned above that I'm trying to use Christmas candy colors in my quilt.  Earlier in the fall, I wrote a post about my Holiday Games quilt and included some ideas for different colorways.  The red/pink/green version really caught my eye and it's the inspiration for this year's quilt.


The Quilt-along will start this Thursday, December 1st.  I'll be posting every other day throughout December and we'll finish up on December 23rd, just in time for Christmas! So exciting!!


And now before I let you go, I'd like to share some amazing photos of last year's mystery quilt, all made by readers of this blog.

This one was made by Jill and I love how she kicked it up a notch by adding the yellow piping:


Here's a beauty made by Maureen from Canada.  I had to include Maureen's home country because my husband is also Canadian!  Yay Canada!


And finally, here's my mom's version!  I love the quilted cross-hatch that she used in the inner border—it adds dimension and it's a great substitute for the big stitch quilting that I used in the original.


Thank you Jill, Maureen and Mom for sending me photos of your gorgeous quilts!


The free pattern/tutorial for last year's mystery quilt is still available on my blog, if you'd like to make your own little quilt.


In the meantime, I'll see you back here on Thursday!!

Saturday, November 19, 2016

Give Thanks - Free Pattern

I've had the idea for this Thanksgiving project circling around in my head for a while and finally had a few hours this morning to knock it out.


It's my Give Thanks mini quilt— a quick little project and the perfect reminder to pause for a moment to ...well... give thanks!


To make your own little quilt, you'll need:

1—7" x 7" square of background fabric
1—7" x 7" square of backing fabric
1—1¼" x 30" strip of fabric for single fold binding
1— 7" x 7" square of batting
embroidery floss (shown in 729 (gold), 400 (rust), and 898 (brown))
13" length of jute, ribbon, rope—whatever you'd like to hang your quilt with

1.  You can find a pdf of the embroidery pattern here.  To make your project as shown, the box around the pattern should measure 5¾" square.  If you'd like to make your quilt bigger, feel free to enlarge the pattern—just remember to adjust the size of your fabric squares accordingly.

2.  Using a washout marking pen, trace the embroidery pattern onto your 7" background fabric square.

3.  Layer the marked 7" background fabric square with the 7" square of batting, insert into an embroidery hoop (I used a 4" hoop), turn on a holiday movie, and settle in for a bit of embroidery. Use two strands of floss and a backstitch for the lettering and wheat stalks.  Stitch the tops of the wheat using two strands of floss and lazy daisies.

4.  When you're finished embroidering, wash out your marked lines.  I use a spray bottle for small projects like this.  I spritz the marked lines, then blot off most of the water with a clean tea cloth, and let the quilt top dry flat on my ironing board.

5.  When you're satisfied that the marked lines are gone, press your work.  Then thread a needle with a short length of embroidery floss or perle cotton (I used green perle cotton).  Insert the needle on one side of the wheat stalks and then bring it up through your work on the opposite side of the wheat.  Tie the two ends of floss or perle cotton into a little bow and trim the ends.

6.  Layer your embroidered background fabric/batting unit with your 7" backing fabric square (I basted my layers together using spray basting adhesive), and trim all layers to desired size.  Again, my finished quilt is 5¾" square.  Bind.

7.  Finally, tie a knot at either end of the 13" length of jute (or ribbon, rope, etc.).  Stitch the knots to the back of your quilt to make a hanging loop.  And that's it!

Hang your little quilt on a door knob, from a hook, or wherever you like.


Or wouldn't it be great to give as a hostess gift on its own or wrapped around the neck of a bottle of wine or a bouquet of flowers?!  Yes please!!

Hope you have fun with this little project and I hope you all have a Happy Thanksgiving!

(p.s. Check back here after Thanksgiving for news about my upcoming 2nd Annual Holiday Mystery Quilt! Can't wait!)

Sunday, November 6, 2016

Candy Stars - Free Mini Charm Pack Pattern

Last week I was hard at work on my latest Moda Bake Shop tutorial, and this mini charm pack of gorgeous "Desert Bloom" fabric by Sherri and Chelsi of a Quilting Life...


...became this sweet little mini quilt!


I named it "Candy Stars" not only because it's made with a Moda Candy, but also because the colorful, sparkly half square triangles in the star blocks make me think of candy.

Candy Stars is fast, fun and easy, and it finishes at 16" square, the perfect size for a pillow!

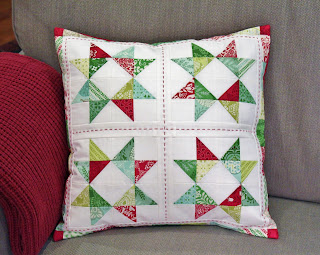
Here's Candy Stars finished as a Christmas pillow and made with Kate Spain's beautiful "North Woods" fabric:


I made this little pillow exactly like the mini quilt, but substituted a white center square for the navy blue that I used in the "Desert Bloom" version.  I also used red perle cotton to embroider an oversized running stitch down the center of the sashing strips and the inner border.  This fun pillow has a totally different vibe than the original mini quilt, but it's just as sweet!

If you'd like to make your own version of Candy Stars, grab a mini charm pack and head over to the Moda Bake Shop for my free tutorial—you'll find complete instructions and lots of picture to help you on your way.

Happy Quilting!