Monday, December 21, 2020

Winter's Walk Quilt-Along — Day 10

Welcome back for Day 10 of the Winter's Walk Quilt-Along!


Today is the last day of our quilt-along and we're tackling finishing details!


Day 10:  Finishing 

Here's the link to today's pattern sheets.  There are two pages today, one with all of the instructions for finishing the quilt, and a second with close-up pictures of the details on both my original Winter's Walk quilt and my variation pillows.


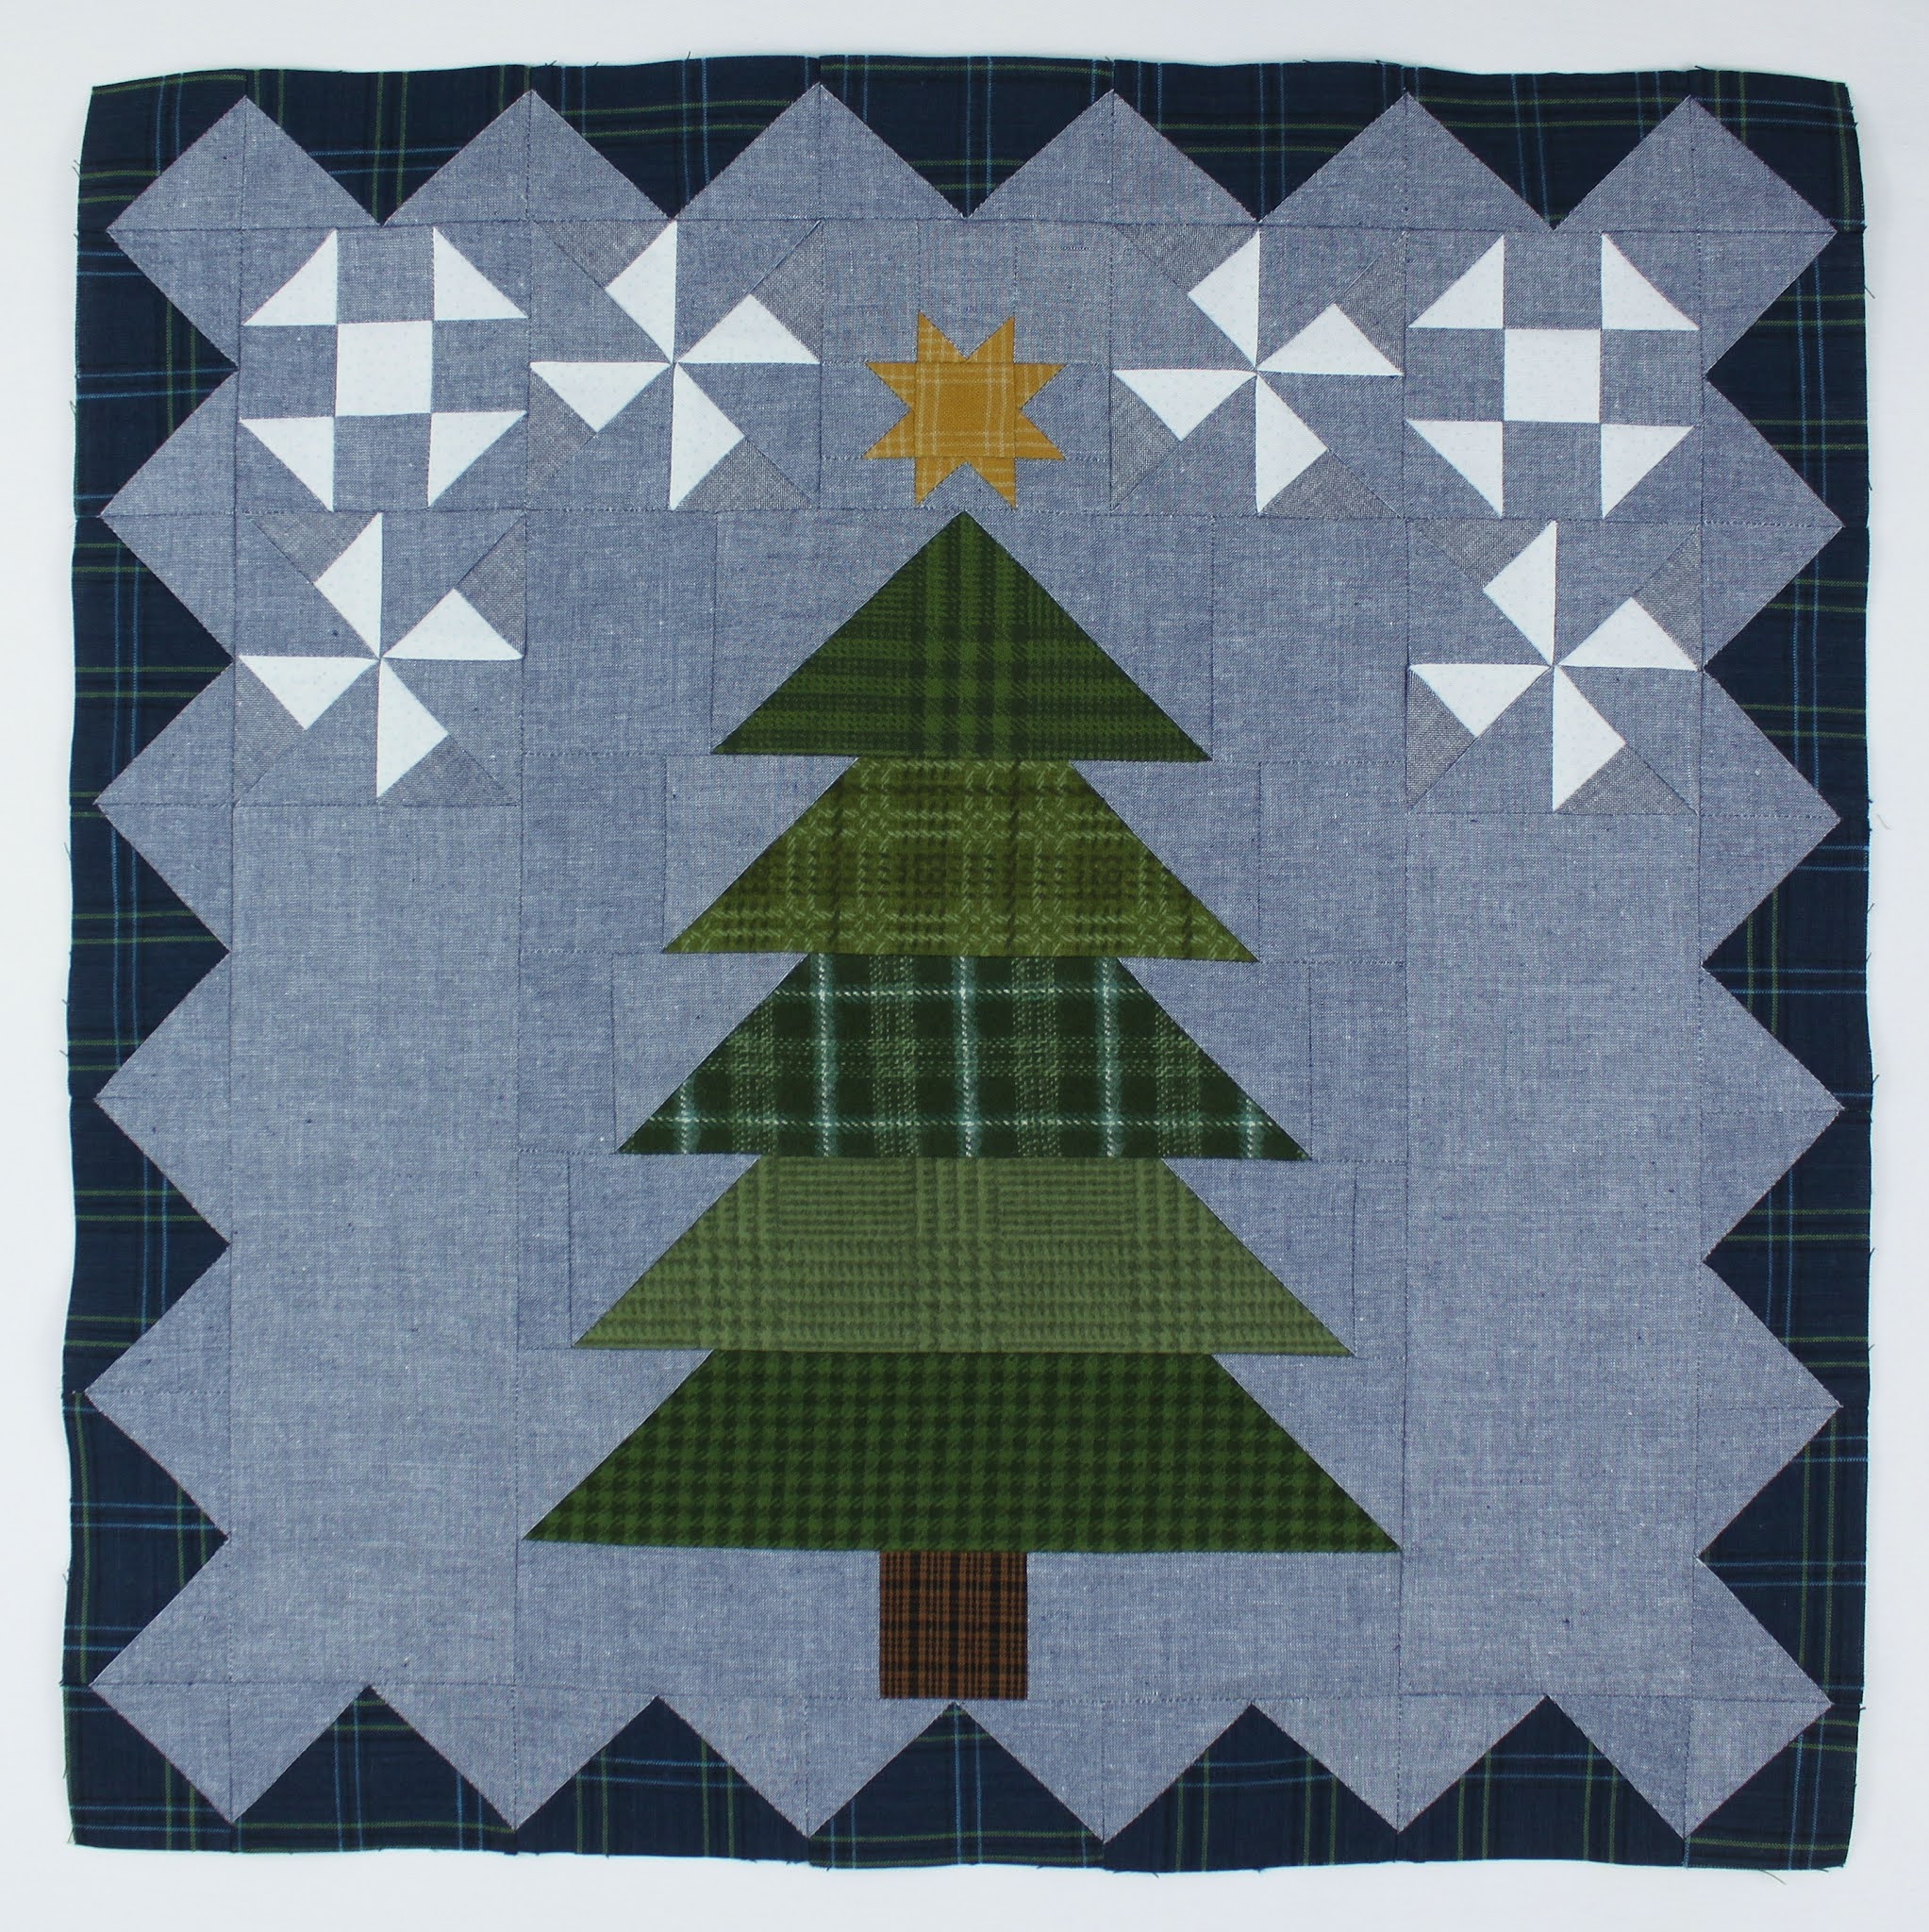
And here's where we're headed:


First off, let's talk snowman faces.  For my original Winter's Walk quilt, I decided to embellish my snowmen so that they were in profile and appeared to be looking at the Christmas tree.  


But for my Winter's Walk snowman pillow, I chose to have the snowmen facing out of the pillow.  I added two button eyes to each and gave them crooked little smiles.  I also adjusted their noses by making them a bit shorter and curving the wider ends.  I think I actually prefer the curved carrot nose, so I've included both patterns to enable you to choose whichever you prefer!


I went back and forth a lot about whether to give the snowmen arms, but in the end, I decided to keep the snowman shape simple and didn't add arms to either project.  Definitely feel free to embroider arms on your snowmen though!  That's what so fun about embellishing a project with embroidery—the opportunity to truly personalize your quilt!


I decorated the Christmas tree on the original quilt with red embroidered garland and white embroidered stars:


Because I made the tree scrappy on the Winter's Walk tree pillow, I decided to forgo the garland, but kept the white stars:


The tree block is another blank canvas that you can embellish to suit your preferences.  You could bump up the embroidery by adding more garland, maybe even with a metallic floss, or by adding stars in different colors.  Don't like to embroider?  Try decorating the tree with small buttons or beads.  The sky's the limit!

I was really happy with the embellished quilt top when I finished my first Winter's Walk quilt, but I think the big-stitched quilting in a cross-hatch pattern sent it over the top!  The diagonal lines act as frames for the "snowflakes" and I love how not quilting over the tree and snowmen make those blocks seem to advance.  The quilting in the outer border doesn't show up as much, but it does give it dimension and accentuates the zig-zag shape of the Flying Geese.


However you choose to quilt your Winter's Walk wall hanging, I'm sure it will be lovely.  I started out as a hand quilter, so I always tend to think of cross-hatching and echo quilting first, but I can't wait to see what you come up with when you finish your quilts!

And that, my quilting friends, brings us to the end of the 2020 Winter's Walk Quilt-Along!  It's been a pleasure quilting along with you and an absolute joy to see your work on social media.  I hope you've had fun and that you'll love your finished quilts.  I also hope you have a joyous holiday season and a happy and healthy new year!

All my best!

—jen


Friday, December 18, 2020

Winter's Walk Quilt-Along — Day 9

Happy Friday and welcome back to the Winter's Walk Quilt-Along!

It's Day 9 and today we'll be finishing our quilt tops by adding the borders.


I think the gradated blue borders on this quilt really make it sing — the zig-zag effect created by the Flying Geese gives it a kind of window frame appearance and makes it seem as though you're looking into the quilt.  Love it!


Day 9:  Adding Borders

Here's the link for today's pattern sheet.


And as promised, here's a look at my second Winter's Walk variation pillow.  For this one, I made an extra snowman block that is a mirror of the original.  I think the snowmen look so cute lined up in a row— this pillow is going to be a fun one to embellish!


Speaking of embellishment, Monday 12/21 will be the final day of our QAL.  We'll be taking on the finishing — giving our snowmen features, decorating the tree for Christmas, and quilting.  Can't wait!!

Have a great weekend and Happy Quilting!

—jen


Wednesday, December 16, 2020

Winter's Walk Quilt-Along — Day 8

 It's Day 8 of the Winter's Walk Quilt-Along and today we'll begin assembling our quilts.


Finally, all of the work you've done making blocks over the past couple of weeks is going to pay off, and you'll begin to see what your finished quilt will look like!


Day 8:  Quilt Center Assembly

Here's the link for today's pattern sheet.

Today's instructions are pretty self-explanatory — no tips or techniques required.  Instead I'm going to give you a peek at my Winter's Walk variation.

I'm taking all of the blocks from the original project and assembling them into pillows!  Here's the first pillow top made with the tree block, star block, 4 Pinwheel blocks, and 2 Shoo Fly blocks, surrounded by a Flying Geese border.


I'm amazed by how much fabric selection can change the feel of a project.  The chambray and plaids that I'm using on my variation give it a casual, primitive look that I love — so cozy!

Have fun assembling your quilt centers and I'll see you back here Friday for more assembly and my second pillow top.  Can't wait to see how it turns out!

Happy Quilting!

—jen

Monday, December 14, 2020

Winter's Walk Quilt-Along — Day 7

Happy Monday and welcome back to the Winter's Walk Quilt-Along!

It's Day 7 and today we're making a star block.


Doesn't sound too taxing, right?  The catch is that it's an itty-bitty star block!  The complete block will measure 3½" square unfinished, but the little Sawtooth Star within measures only 2".  Sounds scary, but it's actually a piece of cake!


Day 7:  Star Block

Here's the link for today's pattern sheet.

We'll be using our tried and true stitch-and-flip corners to make the points for today's star block.  But what really makes this block manageable is that the background pieces are oversized and therefore give us a bit more fabric to handle.  The most difficult part of this block is the unit C (step 6 on today's pattern sheet) — sewing 2 - 1" stitch-and-flip corners to a 1" x 1½" background rectangle.  Be accurate with your marking and stitch directly on the marked line and you should be all set, but just in case,  I've got two other tips that should help you to be successful:

1.  Use a leader, or a small scrap of fabric, to start sewing on before you sew your stitch-and-flip seam.  Start sewing on the leader and when you reach the edge of the scrap do not trim the threads, but instead continue on and sew the stitch-and-flip seam, just like when you chain piece.

2.  Sew the stitch-and-flip seams from the edge of the rectangle, rather than the corner as illustrated below:


Using a leader and sewing from the edge can help prevent thread nests from forming behind your work and will also keep the little pieces from fraying at the edge or from being drawn into the needle hole.  I've learned to use these techniques with all of my piecing, not just with miniature blocks, and it saves me a lot of time and frustration.

That's it for today.  On Wednesday we'll begin assembling our quilt tops!  So exciting!!

Happy Quilting!

—jen

Friday, December 11, 2020

Winter's Walk Quilt-Along — Day 6

Welcome back for Day 6 of the Winter's Walk Quilt-Along!


Today we'll be making our second snowman block!


Day 6:  Snowman with Hat Block

Here's the link for today's pattern sheet.  Once again today's pattern is two pages long, so be sure to print both.

Today's snowman is very similar to the Day 5 snowman—he's just a bit taller and sporting a dashing top hat.  And now that you're a pro at making stitch-and-flip triangles, making this block should be a breeze!


For my Winter's Walk variation, I used two different green plaids for the scarf—one for the knot and a second for the majority of the scarf.  I also fussy cut the black print that I used for the top hat to give it some fun vertical stripes.  This little guy may be my favorite snowman yet!

Have fun making your snowman this weekend!  I'll be back here Monday 12/14 with our last block and then we'll move on to assembly.  Can't wait!

Happy quilting!

—jen

Wednesday, December 9, 2020

Winter's Walk Quilt-Along — Day 5

 It's Day 5 of the Winter's Walk Quilt-Along and after today we'll be halfway there!


Today we're making our first snowman block!  I love this snowman with its cozy scarf—it's a great blank canvas to leave as is or to embellish however you like.  This block is a fun one, so let's get started!


Day 5:  Snowman Block

Here's the link for today's pattern sheet.  Please note that there are two pages today so be sure to print both.

This is a pretty intricate block, but we'll be breaking it down into manageable steps and it comes together surprisingly well.

When you do your cutting, you'll notice that there are some small pieces in this block, namely some 1" x 1" squares.  Don't let this intimidate you.  I mentioned on Monday that the tree block, with its many stitch-and-flip corners, would be good practice for upcoming blocks.  The "curves" of this snowman are made using using the same stitch-and-flip method.  I'm sure you've got the technique down now, so whether you're stitching and flipping 3" squares or 1" squares, the process is exactly the same.  You've got this!

One more quick note, the snowman's scarf is comprised of 4 red print pieces.  One piece, the 1" square, is meant to be the knot of the scarf.  The seams alone will make this piece stand out a bit from the rest of the scarf, but if you'd like to up the contrast of the "knot," feel free to use the solid red, or to fussy cut a 1" square of fabric from your red print, or even to use a scrap of an entirely different print.  For my original version of Winter's Walk, I used a solid 1" square:


and for the variation that I'm working on now, I used a different red plaid:


There no rules here, just fun!  Go ahead a play a bit and see what you like best.

And that, my fellow quilters, is it for today.  Have fun making your snowman and I'll see you back here Friday for Day 6!

Happy Quilting!

— jen

Monday, December 7, 2020

Winter's Walk Quilt-Along — Day 4

Welcome back to the Winter's Walk Quilt-Along!  

We got a few inches of snow over the weekend here in New Hampshire and it's definitely helping with my holiday spirit—fingers crossed that it will last!  I hope you all had a good weekend and that you're caught up and ready to move on because this week we are making some super cute blocks!


Day 4:  Tree Block

Today we're making a Christmas tree block!  And with its stitch-and-flip triangles, this block couldn't be easier to make.

Here's the link to today's pattern sheet.

For my Winter's Walk variation, I decided to use a different green flannel for each of the tree units.  I'm going for a casual, cozy look and I thought that the different plaids would add some fun texture and interest—and who doesn't love a scrappy tree!  One note, if you decide to use flannel for your tree block, press seam allowances open when sewing together the tree and trunk units to reduce bulk.  Flannel=bulk.


No special construction tips necessary today because stitch-and-flip corners are fast and easy.  This block will be good practice for what's coming up next!  So exciting!

Have fun making your tree block and I'll see you back here Wednesday for Day 5!

Happy quilting!

—jen

Friday, December 4, 2020

Winter's Walk Quilt-Along — Day 3

Day 3 already!  I'm always surprised by how quickly time seems to pass in December, especially when I really would prefer that it sloooow down.  Funny how that works :).


Day 3:  Corner Half-Square Triangles and Flying Geese

Today we'll be making half-square triangles and flying geese units.  We're making quite a few flying geese units, 36 to be exact, so I thought it would be best to post this pattern on a Friday to give us an extra day to finish them.  

Here's the link to today's pattern sheet.

To save a bit of time (and fabric), we'll be using a no-waste (i.e. no trimming), fast, 4-at-a-time method for our flying geese, rather than the traditional stitch-and-flip method.

If you like this method, the math is pretty easy to remember for future use.  For the goose (or larger center triangle) of your flying geese unit, you'll need a square that's 1¼" larger than the finished width of your flying geese unit.  For the sky (or smaller triangles) on the either side of the unit, you'll need four squares that are ⅞" larger than the finished height of your flying geese unit.  Our flying geese will finish (not including seam allowances) at 1½" x 3", so we need our larger square to measure 4¼" and our four smaller squares to measure 2⅜".

Today's pattern sheet contains complete instructions and diagrams for making the flying geese using this method so I won't repeat them here.  I will, however, caution you to be very careful and precise with your scant ¼" seam allowance.  A scant ¼" seam allowance is 2-3 threads narrower than an actual ¼" seam allowance.  This allows for the math to work despite the extra seam allowance width that can result when pressing the seam open (because of fabric bulk).  When marking your sewing lines on either side of the cutting line (Making the Flying Geese - Step 1 on the pattern sheet) be sure to take into consideration your ruler and even the width of the pencil lead.  If the line is a perfect ¼" away from the cutting line, your flying geese will end up ever so slightly too small.  Instead try to draw your stitching lines in between the ⅛" and ¼" lines on your ruler from the center cutting line.  Then be sure to sew directly on the line.  Careful marking in the beginning can save you a lot of frustration when you assemble your quilts later.  I've learned this the hard way!

And that'll do it for today!  

Have fun—remember this is fun!!!—making your half-square triangles and flying geese and enjoy your weekend!  I'll see you back here on Monday for Day 4!

Happy Quilting!

—jen

Wednesday, December 2, 2020

Winter's Walk Quilt-Along — Day 2

 It's Day 2 of the Winter's Walk Quilt-Along and today we're making Pinwheel Blocks!  


We won't be using half-square triangles to make our pinwheels, but rather split quarter-square triangles to make our little pinwheels stand on point.  I love how this gives them motion and makes them look like snowflakes!


Day 2:  Pinwheel Blocks


As we did with our half-square triangles on Day 1, we'll make the split quarter-square triangles a little big and then trim them down to size.  To do so, you'll need your trusty ruler with the 45° line again.  Align the 45° line with the unit's longer diagonal seam.  We're trimming the split QSTs to measure 2" square, so make sure that the 1" lines of the ruler intersect at the center of the unit, namely the intersection of the two diagonal seams. 


Trim the right and top sides of the split QST, then turn the split QST 180°, realign the ruler as described above and trim the remaining two sides of the split QST.


Once you've trimmed all of your split QSTs it's time to sew them into pinwheel blocks.  The concern with pinwheel blocks is the bulk that results from all of the seam allowances converging in the center of the block.  The best way to reduce the bulk is to press all of the seam allowances in the same direction around the block.  Easy enough to do for your first two seams, but a little trickier when sewing the rows together with the final seam.  After sewing the last seam, you'll need to remove a couple of stitches from within the seam allowance on both sides of the block where indicated below by the point of the seam ripper.


Next open the block up, lay it on its right side and gently press on the center to open up the seam allowances.  What you're looking for is a mini pinwheel in the center of the seam allowances as shown below.  Once the little pinwheel is visible, you can press all of the seam allowances in the same direction, in this case clockwise.  Press well and then step back and admire your work!


That's it for today!  Have fun making your pinwheel blocks and I'll see you back here Friday for Day 3!

—jen