Showing posts with label free mini quilt pattern. Show all posts

Saturday, July 15, 2017

Halloween Candy - Free Mini Charm Pack Pattern

Happy Holidays, fellow quilters!  It's only July, but today I'm celebrating Christmas and Halloween with my latest Moda Bake Shop tutorial.

Christmas Candy is a 14" mini quilt that I made with a mini charm pack of gorgeous "Petites Maisons de Noël" fabric by French General for Moda.


This little project is fast and easy, but my favorite part is the simple backstitched poinsettias and vines and French Knot berries that wind their way around the red and green patchwork center.


Christmas Candy is also a great portable project—once you've assembled the quilt top, it's the perfect size to take along with you for some summer stitching.


Not quite ready to think about Christmas?  Here's Halloween Candy, a pillow version of the project made with "Hocus Pocus" by Sandy Gervais.


This spooky pillow is embellished with spiderwebs and spiders.  You can find the embroidery pattern here.


I made Halloween Candy the same way as Christmas Candy (find the tutorial here), with just a few adjustments:
  • Before embroidering, I layered the pieced quilt top with both batting and a muslin lining panel.
  • Instead of machine quilting this project, I simply stitched an "x" across each of the junctions (through all layers) in the center patchwork.


  • And rather than binding the project, I used the following steps to turn it into a pillow:

Finishing the Pillow 
  1. Cut two 10" x 14½" panels from your backing fabric. 
  2. Fold one long (14½'') edge of a panel toward the wrong side ⅜'' twice and press.
  3. Stitch the hem close to the fold.
  4. Repeat with the second panel.
  5. Layer one panel on the embroidered and trimmed quilt sandwich, with right sides together and raw edges aligned.
  6. Layer the remaining panel on the opposite side of quilt sandwich, with right sides together and raw edges aligned.
  7. Stitch through all layers using a 1/4'' seam.
  8. Trim the corners to reduce bulk, turn the pillow sham right side out and insert a 14" x 14" pillow form.

Whether you choose Christmas or Halloween, mini quilt or pillow, if you'd like to make this fun mini charm pack project, you can find my free tutorial at the Moda Bake Shop.


Happy Stitching!

Monday, June 5, 2017

Flutter by, Butterfly

The landscape is finally in full bloom here in New Hampshire, and just the other day, I saw my first butterfly of the season.  To celebrate, I thought I'd share a sweet little project that I stitched up over the weekend.


This quick little project fits into a 5" x 7" frame and couldn't be easier!  I made the little butterfly by fusing two pieces of fabric together.  After cutting it out, I stitched it onto the background using a few long straight stitches that do double duty as the butterfly's body.  I did the rest of the stitching using two strands of embroidery floss—using a backstitch for the lettering and flower stems, lazy daisies for the flower petals and leaves, and French Knots for the flower centers.

You can find the pattern for Flutter by, Butterfly here.  Before beginning, make sure that the box of the printed pattern measures 5'' x 7''.  Using a water soluble marking pen, transfer the pattern to a 7'' x 9'' rectangle of background fabric and layer with a 7'' x 9'' piece of batting before stitching.  This step gives a bit of dimension to your stitching and prevents the floss ends from showing through.

After stitching your project, remove the contents of a 5'' x 7'' frame, wrap both layers of the project around the glass, pop it back into the frame and voilà!


By the way, I'm always on the lookout for great frames and I actually found this beauty at Kohl's.  The frame cost only $5 on sale, it comes in several great colors and best of all, it's deep enough to accommodate the extra layers of fabric and batting without having to tape the back.  I bought two and I'll probably go back for more!


Before I go, I just wanted to let you know that I'm hard at work on a big project that I hope to be able to share with you soon.  In order to be able to focus on the project, I've decided to take a month off from blogging.  In the meantime, I wish you all happy quilting and I'll see you back here in July!

Jen

Saturday, November 19, 2016

Give Thanks - Free Pattern

I've had the idea for this Thanksgiving project circling around in my head for a while and finally had a few hours this morning to knock it out.


It's my Give Thanks mini quilt— a quick little project and the perfect reminder to pause for a moment to ...well... give thanks!


To make your own little quilt, you'll need:

1—7" x 7" square of background fabric
1—7" x 7" square of backing fabric
1—1¼" x 30" strip of fabric for single fold binding
1— 7" x 7" square of batting
embroidery floss (shown in 729 (gold), 400 (rust), and 898 (brown))
13" length of jute, ribbon, rope—whatever you'd like to hang your quilt with

1.  You can find a pdf of the embroidery pattern here.  To make your project as shown, the box around the pattern should measure 5¾" square.  If you'd like to make your quilt bigger, feel free to enlarge the pattern—just remember to adjust the size of your fabric squares accordingly.

2.  Using a washout marking pen, trace the embroidery pattern onto your 7" background fabric square.

3.  Layer the marked 7" background fabric square with the 7" square of batting, insert into an embroidery hoop (I used a 4" hoop), turn on a holiday movie, and settle in for a bit of embroidery. Use two strands of floss and a backstitch for the lettering and wheat stalks.  Stitch the tops of the wheat using two strands of floss and lazy daisies.

4.  When you're finished embroidering, wash out your marked lines.  I use a spray bottle for small projects like this.  I spritz the marked lines, then blot off most of the water with a clean tea cloth, and let the quilt top dry flat on my ironing board.

5.  When you're satisfied that the marked lines are gone, press your work.  Then thread a needle with a short length of embroidery floss or perle cotton (I used green perle cotton).  Insert the needle on one side of the wheat stalks and then bring it up through your work on the opposite side of the wheat.  Tie the two ends of floss or perle cotton into a little bow and trim the ends.

6.  Layer your embroidered background fabric/batting unit with your 7" backing fabric square (I basted my layers together using spray basting adhesive), and trim all layers to desired size.  Again, my finished quilt is 5¾" square.  Bind.

7.  Finally, tie a knot at either end of the 13" length of jute (or ribbon, rope, etc.).  Stitch the knots to the back of your quilt to make a hanging loop.  And that's it!

Hang your little quilt on a door knob, from a hook, or wherever you like.


Or wouldn't it be great to give as a hostess gift on its own or wrapped around the neck of a bottle of wine or a bouquet of flowers?!  Yes please!!

Hope you have fun with this little project and I hope you all have a Happy Thanksgiving!

(p.s. Check back here after Thanksgiving for news about my upcoming 2nd Annual Holiday Mystery Quilt! Can't wait!)

Sunday, November 6, 2016

Candy Stars - Free Mini Charm Pack Pattern

Last week I was hard at work on my latest Moda Bake Shop tutorial, and this mini charm pack of gorgeous "Desert Bloom" fabric by Sherri and Chelsi of a Quilting Life...


...became this sweet little mini quilt!


I named it "Candy Stars" not only because it's made with a Moda Candy, but also because the colorful, sparkly half square triangles in the star blocks make me think of candy.

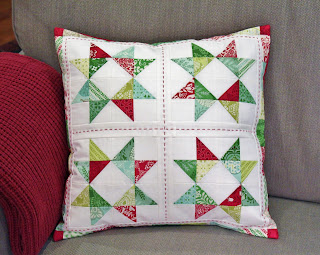
Candy Stars is fast, fun and easy, and it finishes at 16" square, the perfect size for a pillow!

Here's Candy Stars finished as a Christmas pillow and made with Kate Spain's beautiful "North Woods" fabric:


I made this little pillow exactly like the mini quilt, but substituted a white center square for the navy blue that I used in the "Desert Bloom" version.  I also used red perle cotton to embroider an oversized running stitch down the center of the sashing strips and the inner border.  This fun pillow has a totally different vibe than the original mini quilt, but it's just as sweet!

If you'd like to make your own version of Candy Stars, grab a mini charm pack and head over to the Moda Bake Shop for my free tutorial—you'll find complete instructions and lots of picture to help you on your way.

Happy Quilting!

Sunday, March 20, 2016

Nor'easter Schmor'easter mini quilt - free pattern

It may say that it's now Spring on the calendar and it may be gloriously sunny for the moment, but baby, it's cold outside!  And with a nor'easter headed for New England (although maybe not quite as far inland as central New Hampshire), the colorful flowers that I'm longing to see still seem a long way off.  Once again, quilting comes to the rescue...

Here's a fast and fun little mini quilt that's charming hanging from a door knob or any place you'd like to see a bit of color.


I'm calling it my "Nor'easter Schmor'easter mini quilt" and here's the pattern:


You'll need:

Pink batik:  4 -- 2¼" x 2¼" squares
Yellow batik:  2 -- 2½" x 2½" squares, further cut once diagonally to form 4 triangles
Green batik:  2 -- 1½" x 2" rectangles
     1 -- 1½" x 3½" rectangle
     2 -- 2½" x 2½" squares
     1 strip 2¼" x 40" for binding
Ivory batik:  6 -- 1½" x 1½" squares
     2 -- 1½" x 2½" rectangle
     5 -- 2½" x 2½" squares, further cut once diagonally to form 10 triangles


First we'll tackle the stem and leaf portion of the quilt:

1.  On the back of 4 of the ivory batik 1½" x 1½" squares use a pencil to lightly draw a line diagonally from one corner to the other.

2.  Layer the 4 ivory batik 1½" x 1½" squares atop the 2 green batik 2½" x 2½" squares with right sides together as follows and stitch on the drawn lines.


3.  Press seams open towards the ivory batik and trim seam allowances to ¼".


4.  Stitch 1 ivory batik 1½" x 2½" to each of the units created in step 1-3 above.  Press seams open towards the ivory batik.


5.  Stitch together the units created in step 4 above and the green batik 1½" x 3½" rectangle as follows.  Press seams open towards the green batik "stem".


Now onto the flower portion of the quilt:

1.  Paper piece 4 petal units as follows using the remaining pink, yellow, green, and ivory patches.  Here's the link for petal unit 1 (bottom left); and the link for petal unit 2 (bottom right); and finally the link for petal unit 3 (top -- you'll make two of these units).  It might help to color the sections with colored pencils before starting to stay organized.  And if you're new to paper piecing, here's a link to a basic paper piecing tutorial on Craftsy.


2.  Stitch the 4 petal units together as follows:


3.  Finally stitch the flower unit to the stem/leaf unit, quilt as desired and bind.  I machine quilted just outside the edge of the flower, stem, and leaves using ivory thread.  I also quilted a diamond about ½" inside the yellow flower center to help it lie flat.


And that's it!  Make one flower or a garden of them!  No need to wait for Mother Nature!

Happy Spring!

Monday, January 5, 2015

Happy New Year and Free Pattern!

The holiday season is, at long last, over.  No more parties, no more presents, no more massive meals, and no more egg nog (sniff).  It was so much fun, but now it's time to get back to clean living and definitely time to get back to work!

And since I haven't set foot in my work room since before Christmas and the house is looking a little bare with all of the Christmas quilts packed away for next year, today I decided to kill two birds with one stone and start the year off with a warm-up project.

It's a mini snowflake quilt!  Strictly speaking, it's a single 6" block, but since it's layered and bound, in my mind it's a quilt and if you stand back and squint at it, it kind of resembles a snowflake.  Work with me here, I'm a little rusty.


Here's the quilt hanging by the door handle of our front door:


And here are a few EQ7 sketches of some coloring alternatives that I considered:


I'm always struck by how much you can change the look of a block just by moving color around.


If you'd like to make your own mini snowflake quilt, read on...


You'll need (and this is for my version):

White:  1 - 2 1/2" x 2 1/2"; 8 - 1 1/2" x 2 1/2"; and 4 - 1 1/2" x 1 1/2"
Dark Blue:  1 - 4" x 4" and 20 - 1 1/2" x 1 1/2" 
Light Blue:  1 - 4" x 4"


Here we go:

1.  On the back of 16 blue 1 1/2" x 1 1/2" squares, draw a diagonal line from corner to corner.


2.  Place a white 1 1/2" x 2 1/2" rectangle wrong side down on a flat surface.  Referring to quilt, lay dark blue 1 1/2" x 1 1/2" atop white rectangle with wrong side up (should be able to see drawn lines).  


3.  Stitch.  Press towards blue and trim away excess fabric.  Repeat steps on the other end of the white 1 1/2" x 2 1/2" rectangle.  


4.  Repeat to make 8 half chevron units.  Note:  4 of the chevron units should slant down to the right and 4 should slant down to the left -- I know this because I originally made 8 identical units -- I told you, I'm rusty.


5.  Next we'll make the dark blue and light blue half square triangles.  On the wrong side of the light blue 4" x 4" square, draw diagonal lines a scant 1/4" from each side of the true diagonal as shown:


6.  Lay light blue 4" x 4" square atop dark blue 4" x 4" square with right sides together.  Stitch on drawn lines.  Press seams and rotary cut unit as follows: 


7.  You should end up with 8 half square triangle units.  Press the units open towards the dark blue and trim to 1 1/2" x 1 1/2".


8.  Now lay out the assembled units and remaining patches as follows:


9. Stitch together 4 corner sections as follows, pressing away from the white when possible:


10.  Also stitch together half chevron units to make 4 full chevrons.  Press seams open.

11.  Lay out units and center patch as follows:


12.  Stitch together in rows, then stitch rows together.

13.  Press, layer with batting and backing fabric, quilt if desired, and bind.

And voilà!  A striking mini snowflake quilt or a ridiculously beautiful potholder!  Your choice.  Only kidding!  I strenuously object to the use of mini quilts as potholders.

Happy Quilting!